Getting Started
We’re here to help!
This document is the Implementation Guide – User Manual of AHALTS Products and intended to provide all the necessary information to use the system and applications.
The implementation Guide is designed to adjust the AHALTS Products to the requirements of a new customer. You use the implementation guide to structure and organize the implementation of AHALTS products in your company.
Implementation guide is a hierarchical structure of the applications areas in the component hierarchy. It contains all the work steps required for the implementation with documentation.
Before Starting
AHALTS Cloud Solution requires basic system requirements as mentioned below.
- Any operating system
- 4GB RAM available
- Browser – Chrome / Mozilla Firefox
Other operating system users like Apple (Mac) can use Safari Browser.
Get Training
This chapter covers basic understanding of all AHALTS Products, their features, forms layouts, URL and Images.
Below are the lists of all Applications:
A - AI and Micro Service Platform
H - Human Resource Management System
A – Action and Business Management Platform
L – Learning Management System and Knowledge Management System
T – Total Workforce Management
S – Solution and Services
Navigation in AHALTS Products url
How To Navigate in AHALTS Products?
- Header Navigation – Application Navigation
A - AI and Micro Service Platform
H - Human Resource Management System
A – Action and Business Management Platform
L – Learning Management System and Knowledge Management System
T – Total Workforce Management
Go to Playstore and Search TipTopPeople application. Download application and use.
S – Solution and Services
TTMail – Messmail and Communication https://tiptopmail.com/
Project Management (Kanban Board) - https://teams.ahalts.com/
.Account Set Up
Setting Up Your Account
All AHALTS applications and Software’s are access through license (can be Demo or Purchase) wherein system create an identity based on Tenant.
AHALTS gives feature of creating multiple company hierarchy within a single Tenant and gives a single access to all application with the use of SSO (Single Sign On).
Customer can purchase multiple license for individual enterprise based on their requirements however each license will have separate access identity but keeping user credential same for all licenses.
Below are the Tasks which will require completing the license process:
- How To Request For Demo or Purchase
- How New User Register
- How To Buy License
- How To Activate License
2.1 How To Request For Demo Or Purchase
Overview:
Request For purchase or demo can be communicated via many ways, however this section only covers how customers can directly approach us from our website.
Our Website – Tiptopplanet.com, is a single source online information site from where customers can know about our products and communicate us on any subject.
Get Started:
2.1.1 Go To www.ahalts.comwebsite.
2.1.2. Click on Request a Demo.
2.1.3 Fill the form and Submit for request demo.
2.1.4 After Submit the Request Demo, the Thank You acknowledgment message will appear.
2.1.5 Continue button will take you back to request demo form, if you have more requests submit the form else explore Tiptopplanet.com website.
Attention:
Once AHALTS Sales Team will receive customer demo request, they will contact customer and send an invitation message for customer to register on the site for accessing services.
2.2 How New User Register
Overview:
User Registration on AHLATS platform can be done through;
- Invitation Message and Fill User Registration Form
Below process are covered in detail in Onboarding Employee Section
- Mobile App User Registration Form
- Bulk User Registration (Support Team will Assist)
- Onboard Users In HRMS.ahalts.com
Get Started
Invitation Message and Fill User Registration
2.2.1. AHALTS Sales Team will send invitation message on email address provided by customer in Request Demo.
2.2.2. Customer Will Receive Email along with Registration link from Sales Team.
2.2.3. Click on Link provided in invitation message for registration.
2.2.4 Fill Register Form.
Register Form fields like (First name, last name and email) comes auto selected and rest information (username, password etc.) needs to be filled by the user.
All The fields are mandatory and also user has to check mark the Terms and Condition “I Agree”.
Once all fields are filled, click on submit.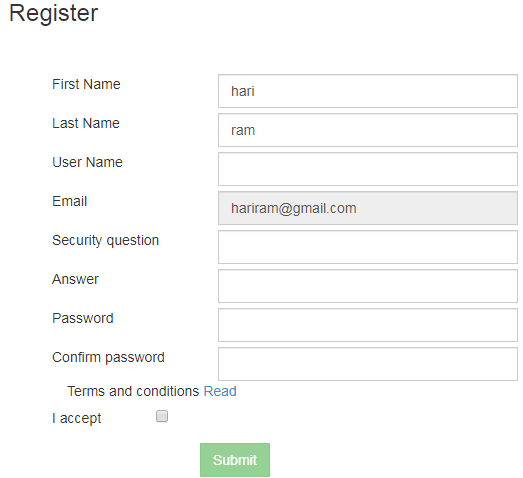
2.2.5. Account Activation
Once user click on submit button an alert in green color generates with message "Success you are successfully registered, please verify your account. Thank you."
2.2.6 User Login
AHALTS provide free application access to communication platform i.e. TTMail and TipTopPeople Website for updating KYC (Profile) and Communicate with AHALTS ecosystem.
There are three fields
Company Name: only to be filled for company user who has been linked to the company
Username
Password
2.4 How To Change Password and Secret Question
Overview
This section provides information on changing user password and secret question.
Get Started
Step 1. Go To tiptopplatform.com
Step 2. Click on Login and enter username and password.
Company Name is optional for Business User.

Step 3. Click on Change Password.

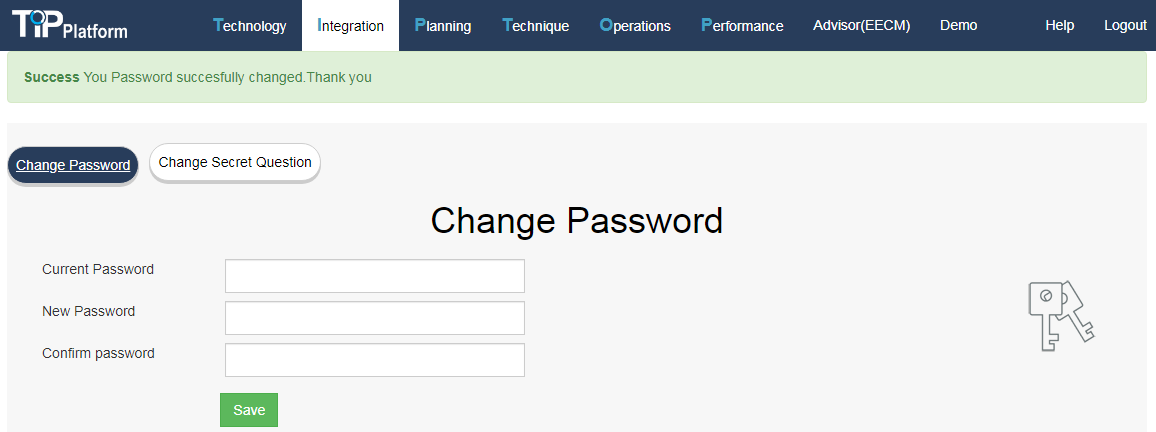
Step 4. Show Below Page with two options; Change Password and Change Secret Question.
If User want to change both Password and Secret Question, than has to enter details in both form else can simply change with new password and exit.

Change Password
Enter current password
Enter New Password – Make Sure password should contain One Upper case, One Symbol and Alpha Numeric.
Enter Confirm Password – Enter Again New password.

Click on Save Button.

Page will show message “Password Successfully Changed. Thank You”.
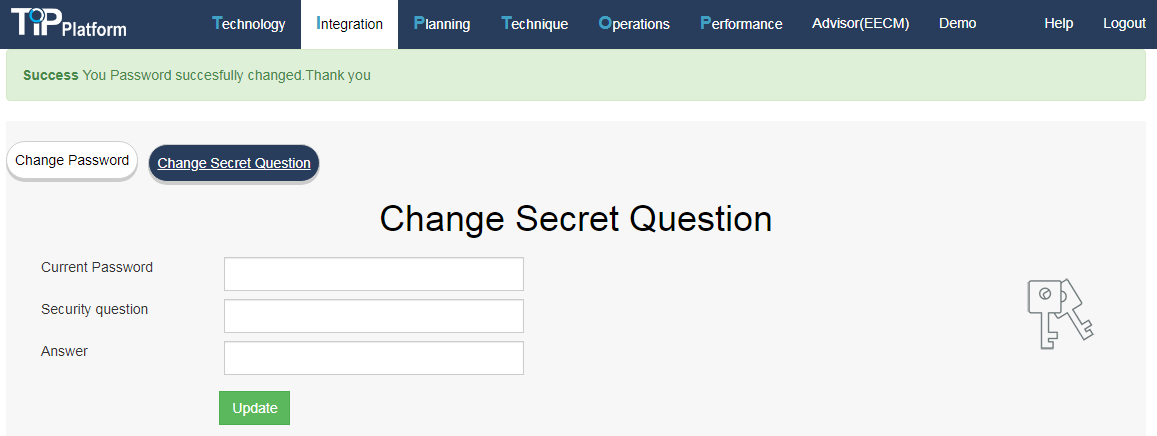
Change Secret Question
Click on Change secret Question button, below page will appear.
Enter the Current Password
Enter Security Question
Enter Answer
Click on Update Button.
Page will show message : “Secret Question and Answer Successfully changed. Thank You” .
Employee Off-Board User Manual
Introduction
Employee offboarding is a structured process that ensures a smooth transition when an employee leaves the company. This process is essential for maintaining organizational security, transfer, and compliance with policies.
Objectives
- Ensure a smooth transition for departing employees.
- Protect company assets and information.
- Facilitate transfer and exit interviews.
- Maintain positive relationships for future networking.
Offboarding Process Steps
1. Notification to Departure
Receive communication from employee via Letter or message send by TTmail to Respective HR Department.
2. Off Boarding documentation process

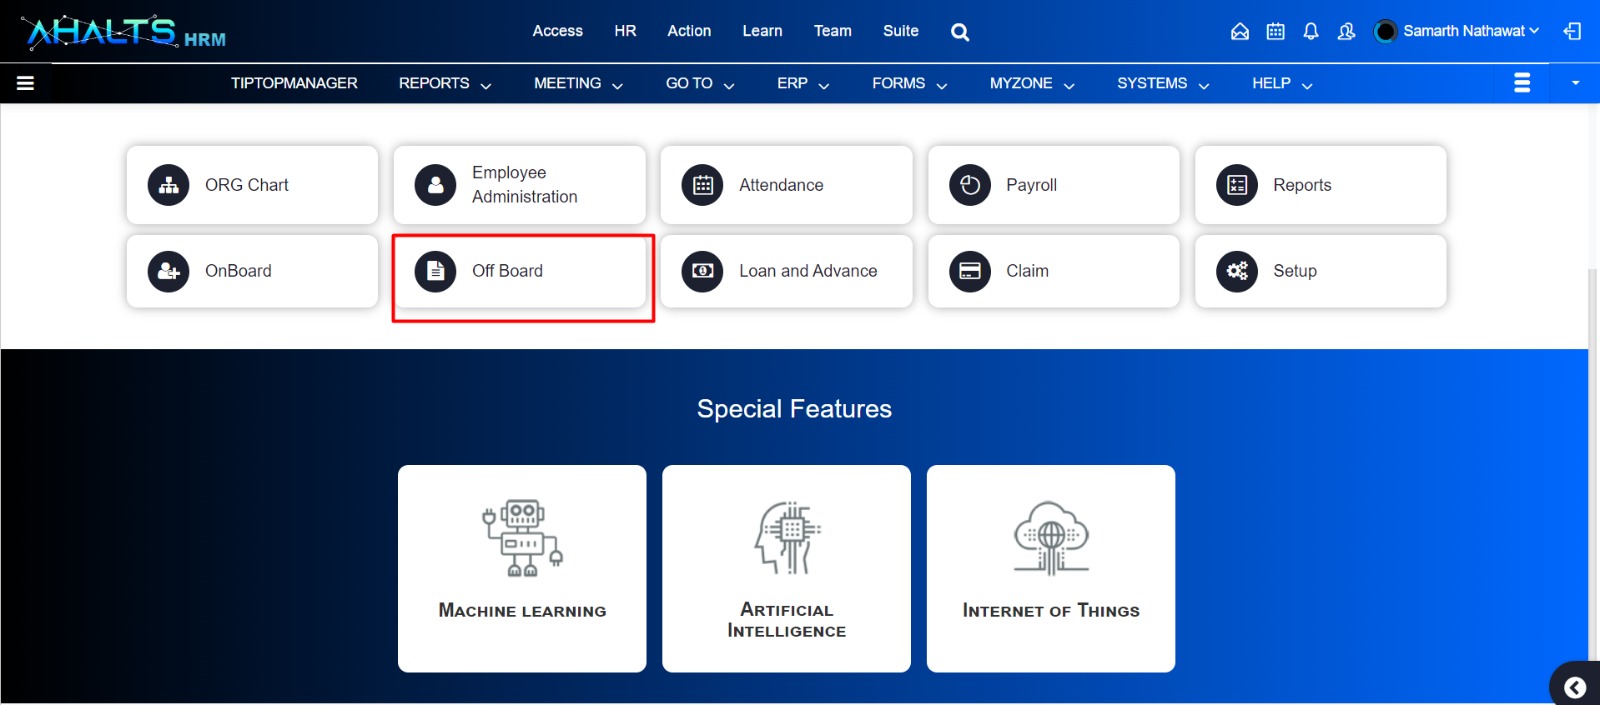
- Go To hrms.ahalts.com
- Click on Offboard button
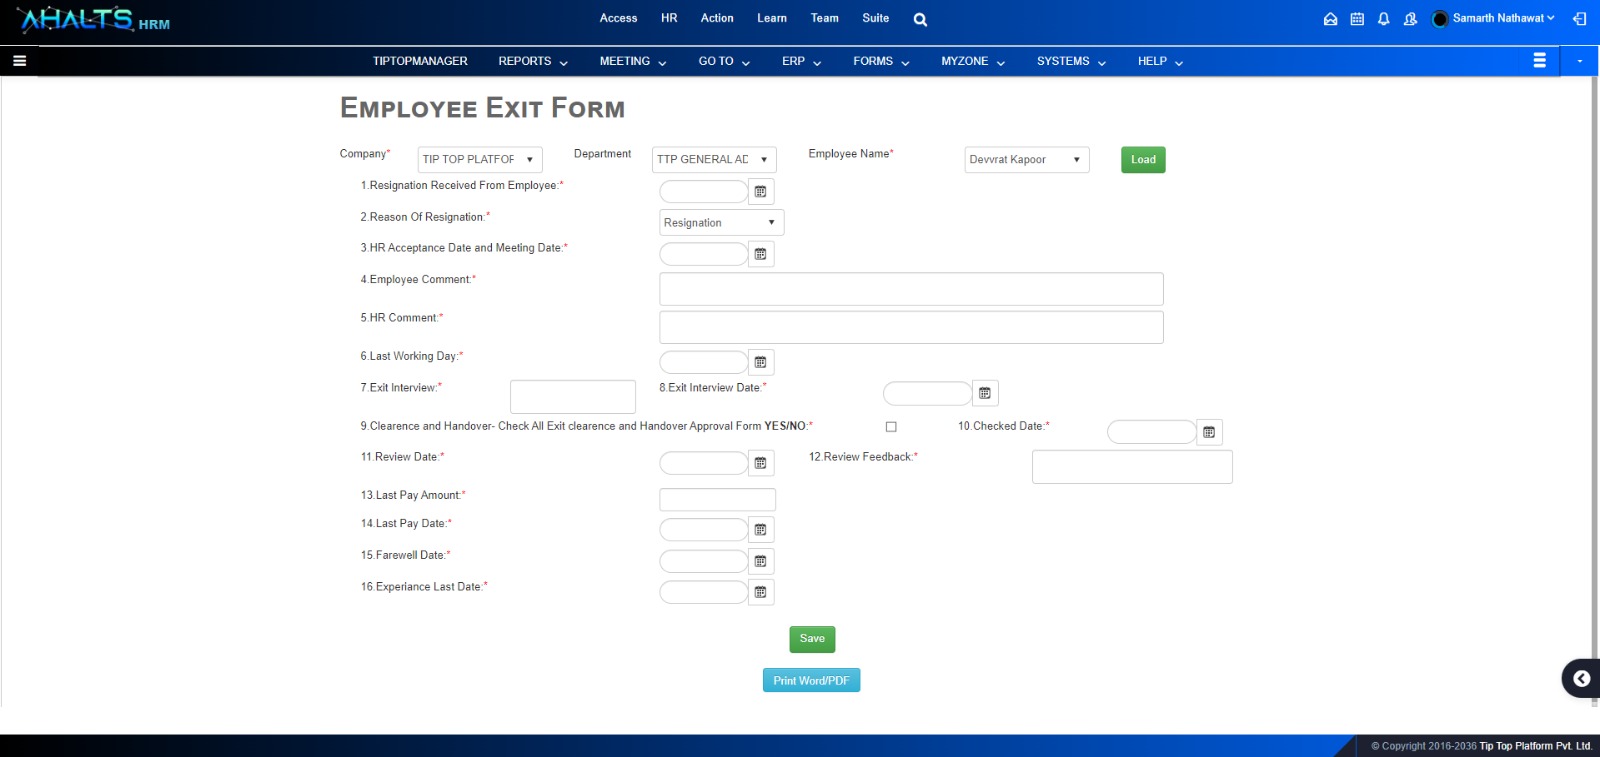
Select Company, Department and Employee.
Click on Load button,
Exit Form will open, where HR need to fill all information for documentation purpose.
1. Resignation Received From Employee: Select Date on which resignation received
2.Reason Of Resignation: Select reason from list
3.HR Acceptance Date and Meeting Date: select date at which HR Department accept employee resignation.
4.Employee Comment: Enter Employee comments or feedbacks
5.HR Comment: Enter HR comments based on exit round decision
6.Last Working Day: Define Last working date of employee
7.Exit Interview: Enter exit interview comments
8.Exit Interview Date: Enter Exit interview date
9. Clearance and Handover- Check All Exit clearance and Handover Approval Form YES/NO:* If all clearance and Handover done than check the checkbox.

10.Checked Date: Select date on which checklist filled with comments
11.Review Date: Select Review date for final review of exit process
12.Review Feedback: Enter feedback of Review
13.Last Pay Amount: Enter Due Amount for clearance
14.Last Pay Date: Select date on which last pay will be due
15.Farewell Date: Enter farewell date
16. Experience Date: Enter Last day till experience will be calculated
17. Experience : Calculated period of experience
Click on save.
Entire Exit Documentation can be printable, Click on Print Button
3. Approve Offboard Employee
Once the form is filled and saved , it will direct to approval page for final approval, HR department can approve or discard further however once approved the record will remove from active employee list and transfer to Inactive employee list.

Select Check and click approve or discard.
On Discard the entire Step2 will process again.
On approval, page will show entire exit form for final view. Click OK

Page will display entire filled exit form, click Save.
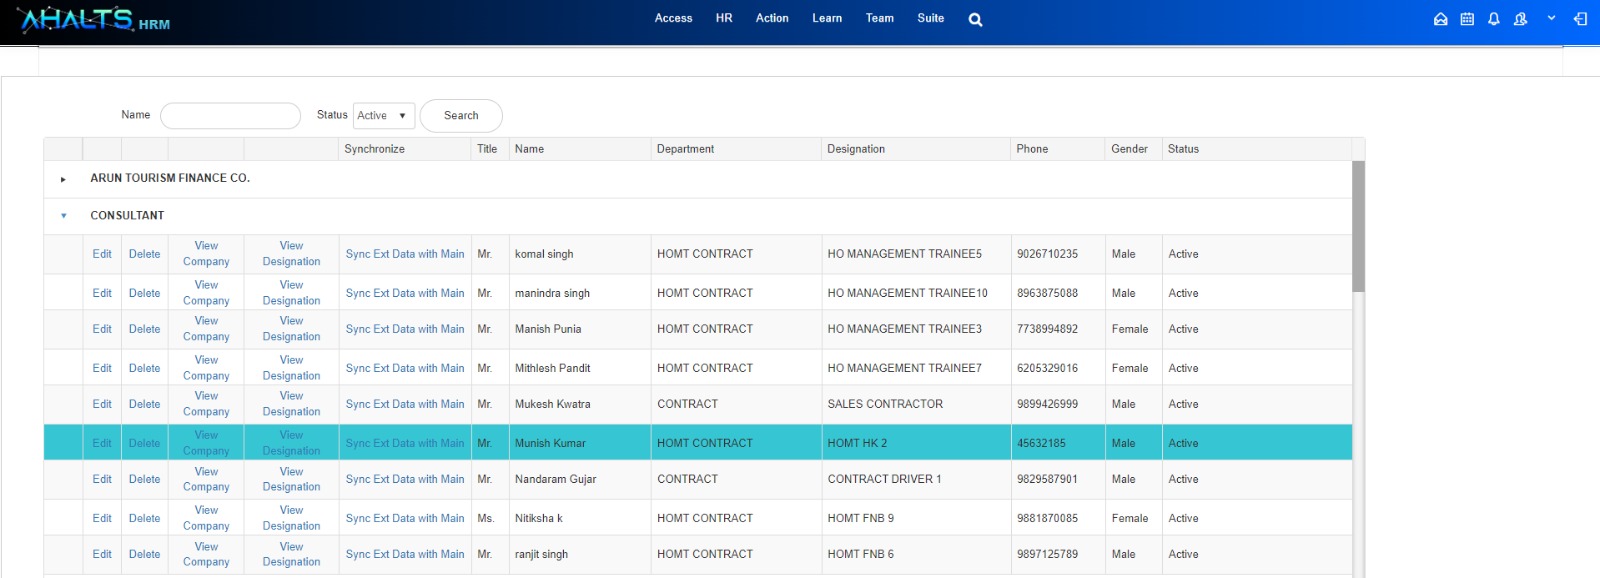
All Off Board employee will display in Inactive employee page
Employee Onboarding User Manual
Introduction
This manual is designed to guide new employees through the onboarding process, ensuring a smooth transition into the company. It outlines essential steps, resources, and expectations for successfully completing onboarding.
Employee Onboarding Process Overview
Accessing the Onboarding System
- Visit: hrms.ahalts.com
- Click on: “Onboard” to access the onboarding portal.

Onboarding Steps
Follow these steps to complete the onboarding process:
- Register User
- Link to Company
- Approve KYC/Update Policies
- Add Leave Group
- Assign Facilities
- Add Employee Attendance Rights
- Add Roaster
- Add Salary
Step-by-Step Instructions
1. Register User
- Navigate to the Register User Page:
- Fill in the required user details, including:
- Full Name
- Email Address
- Phone Number
- Position
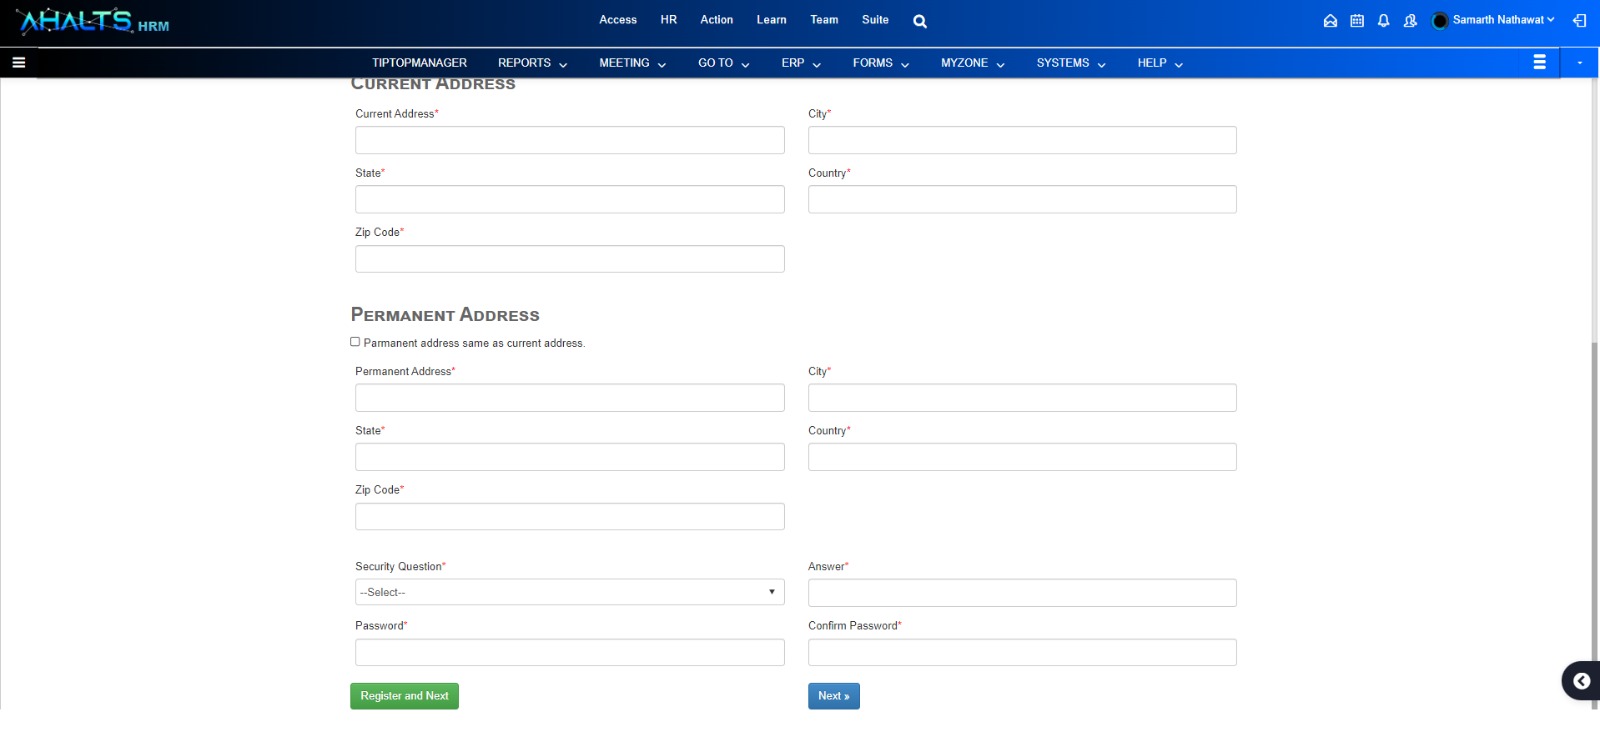
- Click Register to create the user account.
- After registration, click Next to be redirected to the Assign User to Company page.
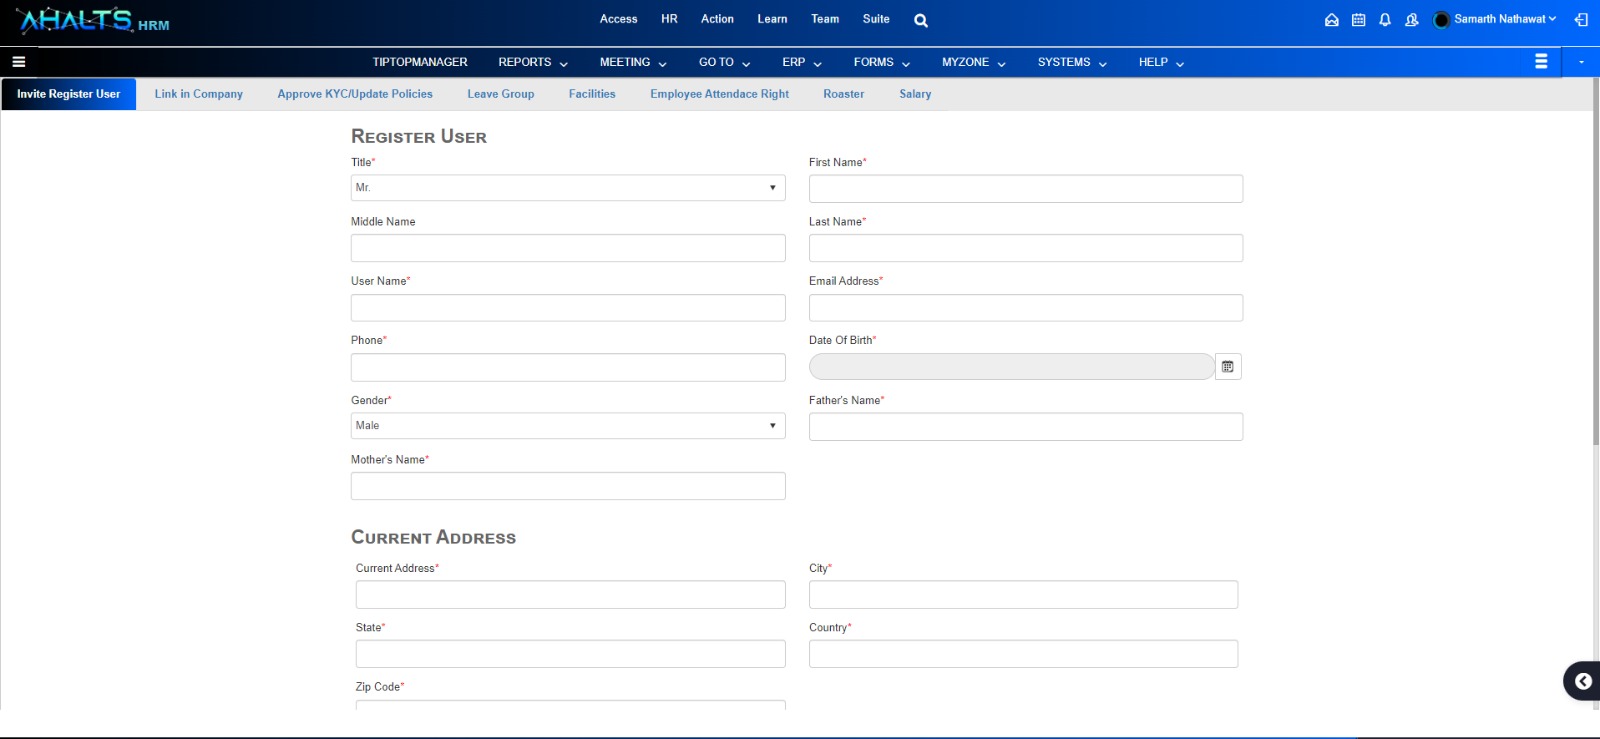
Go Register User Page:
- Link to Company
- Select Company Information:
- Choose the appropriate Company, Department, and Designation for the employee.
- Enter the Username created during registration.
- Check both the Default Designation and Report Designation checkboxes to ensure proper role assignment.
- Click Assign Designation.
- Click Next to proceed to the Approve KYC Form.

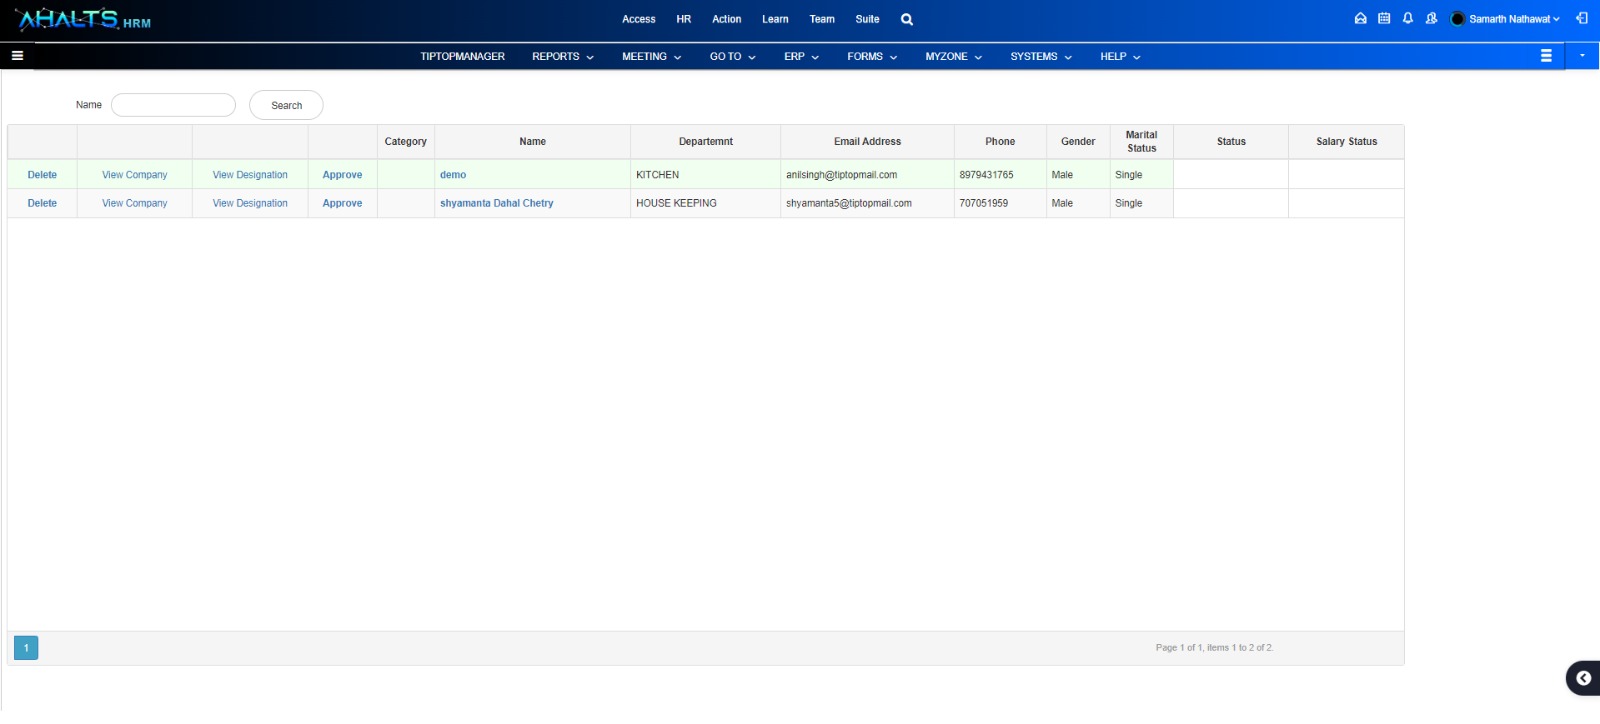
- Approve KYC/Update Policies
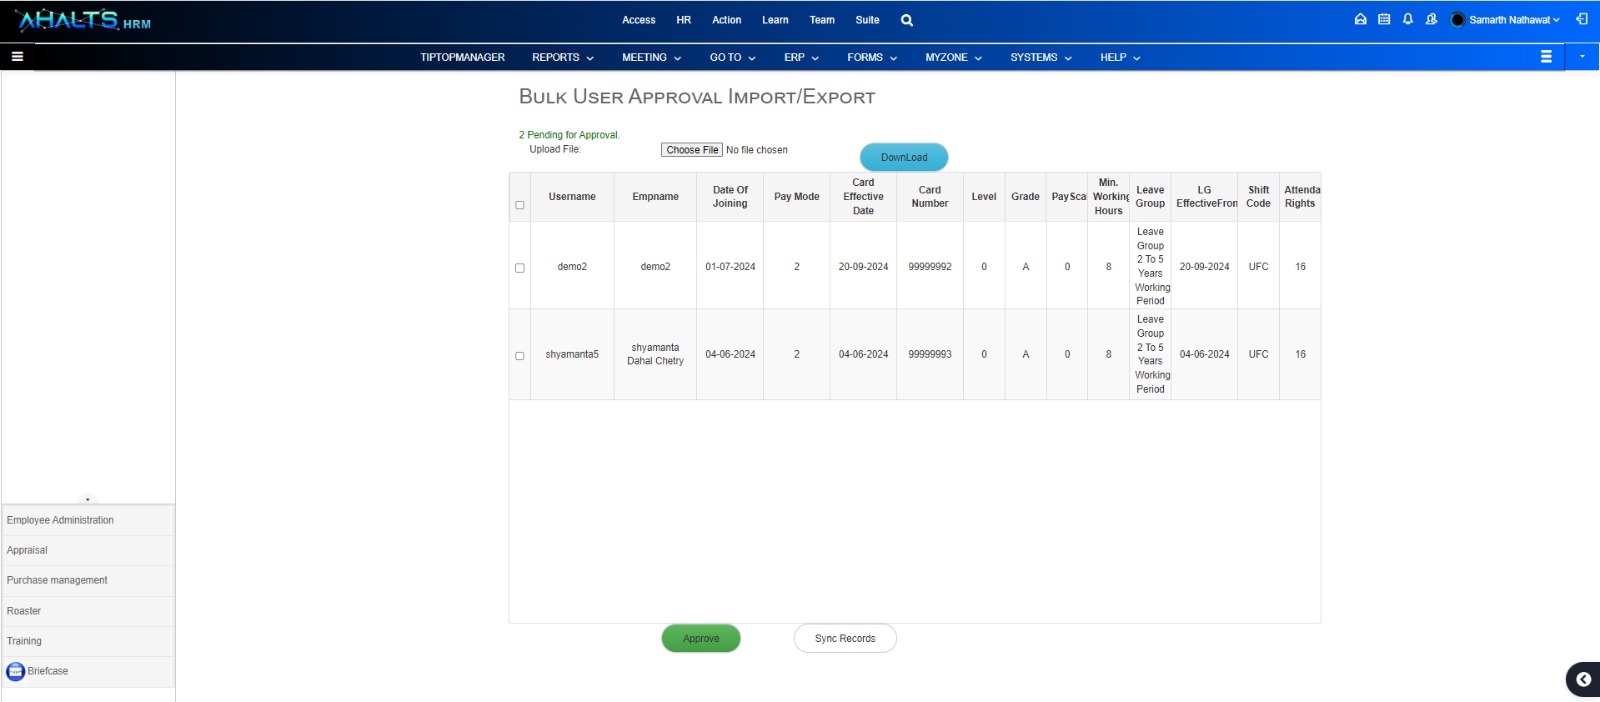
- Bulk Approval Process:
- For bulk approval, click on Click Here.
- Download the provided Excel file.
- Open the file and correct the following fields:
- Date of Joining (DOJ)
- Effective Date
- Shift
- Save the file and re-upload it to the portal.
- Check the checkbox next to the usernames to approve and click Approve to finalize the data.
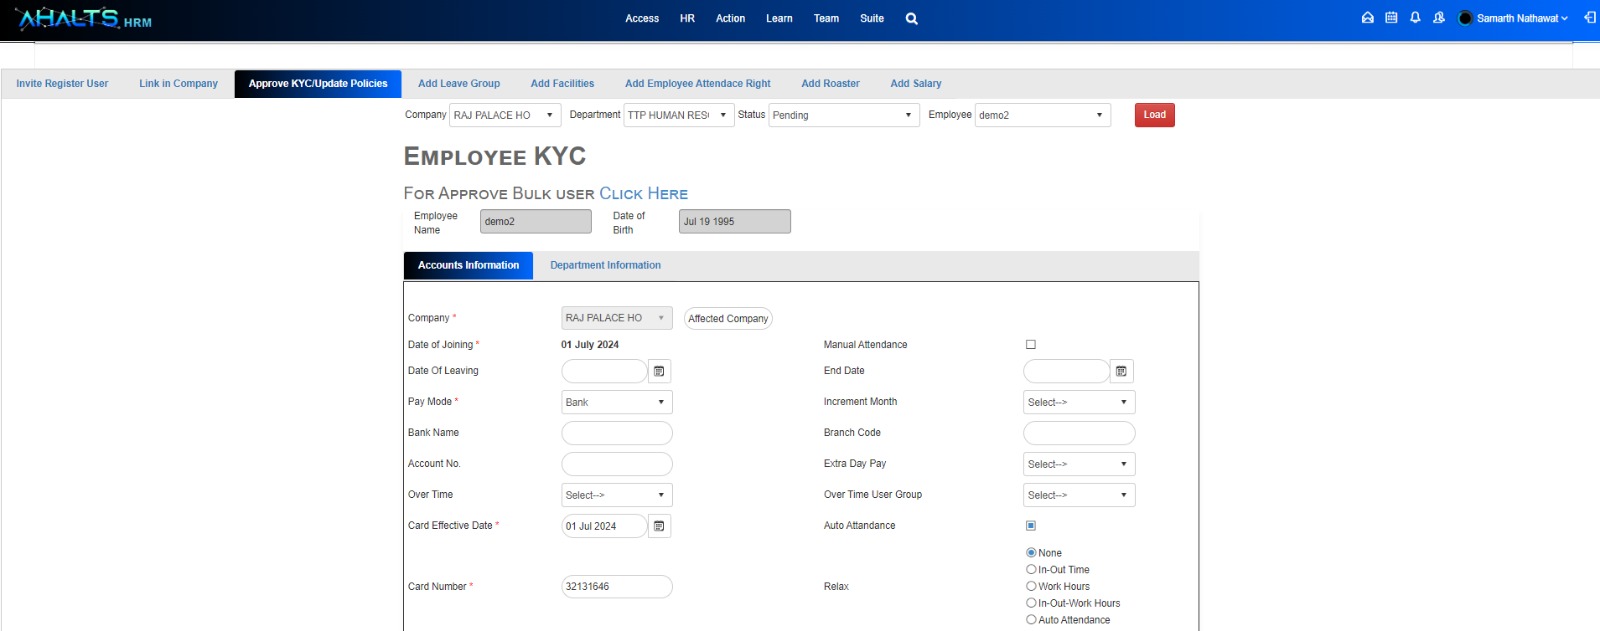
- Manual Approval Process:
- Select the Company, Department, and Employee Status, then click Load.
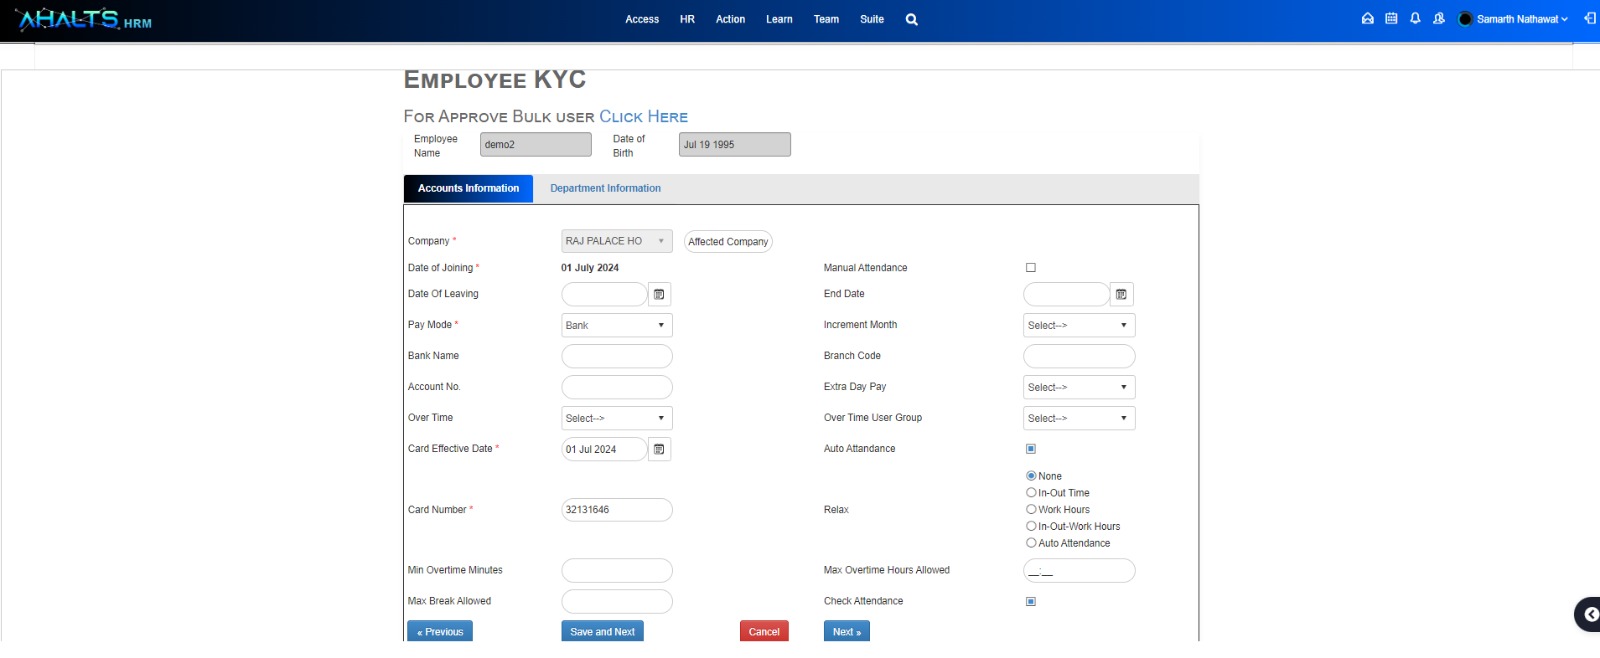
- Fill in the required fields:
- Date of Joining
- Pay Mode
- Card Effective Date
- Card Number
- Click Save to store the information.
- Click Approve to finalize and proceed with the process.

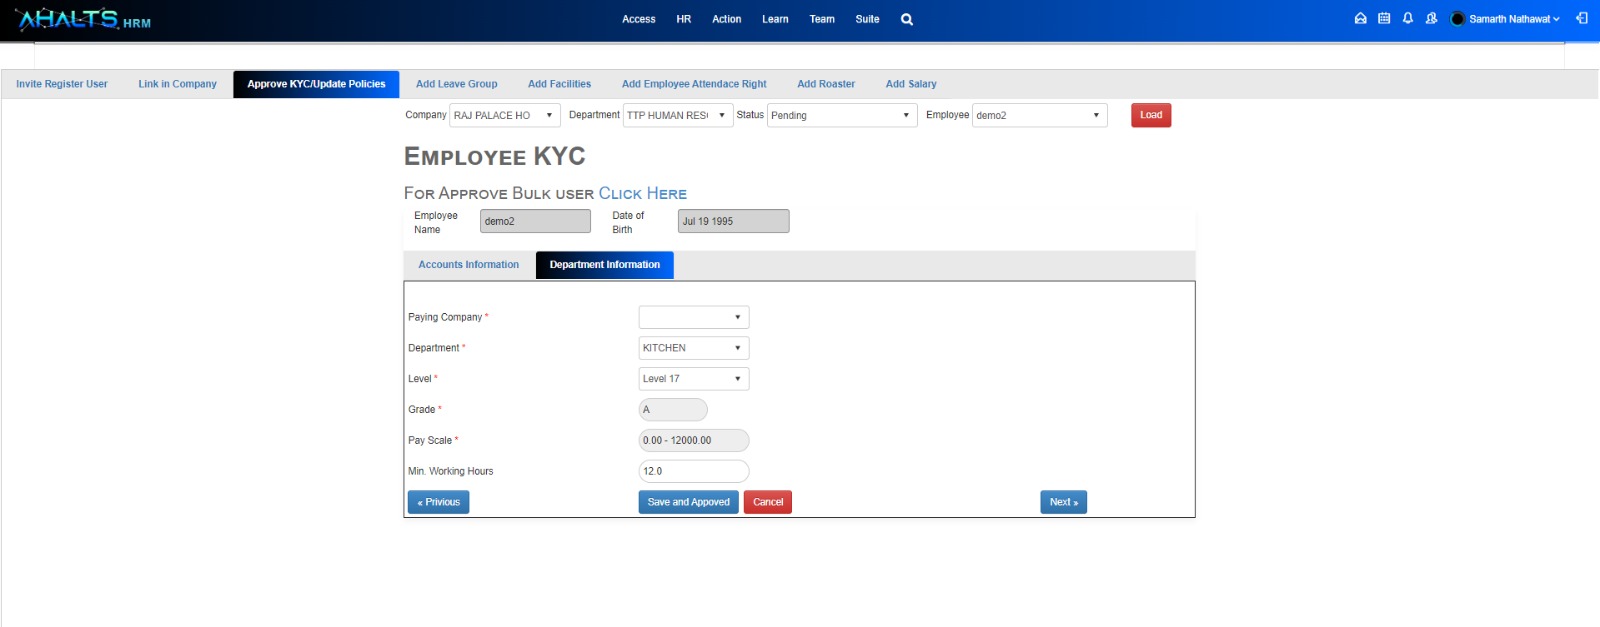
And click on final level approve
- Add Leave Group
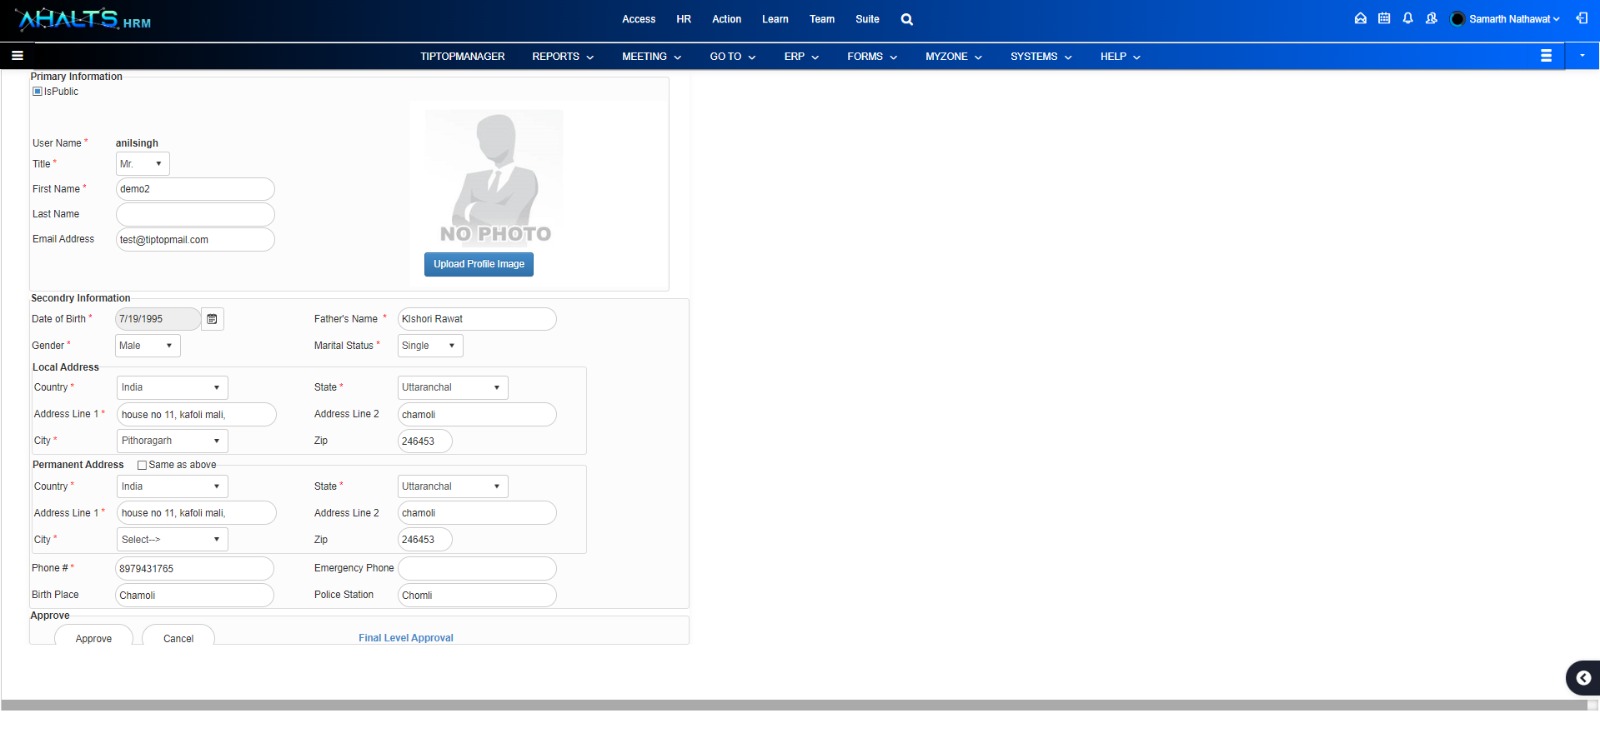
- Assign Leave Group:
- Click Load to access the leave application section.
- Select the appropriate Company, Leave Group, and Effective Date for the employee.
- Click Save to apply the leave group.
- Approve the employee's leave group assignment to complete this step.
 >
>
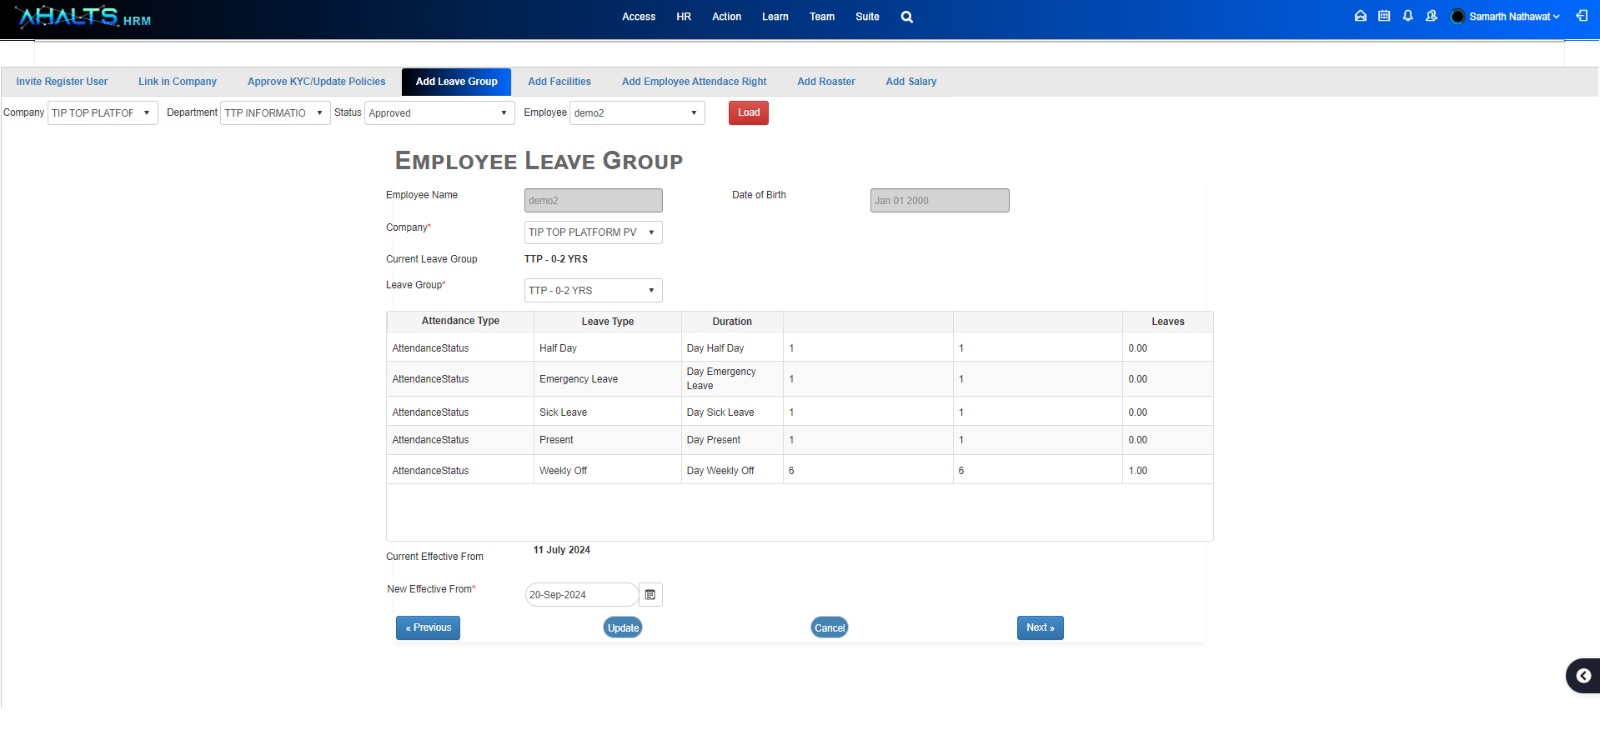
- Assign Facilities
- Assign Facilities to the Employee:
- Click Load to view available facilities.
- Check the boxes for the facilities you wish to assign, entering the required Quantity and any Notes.
- Click Save to store the facility assignments.
- Approve the assignment to finalize this process.
 >
>
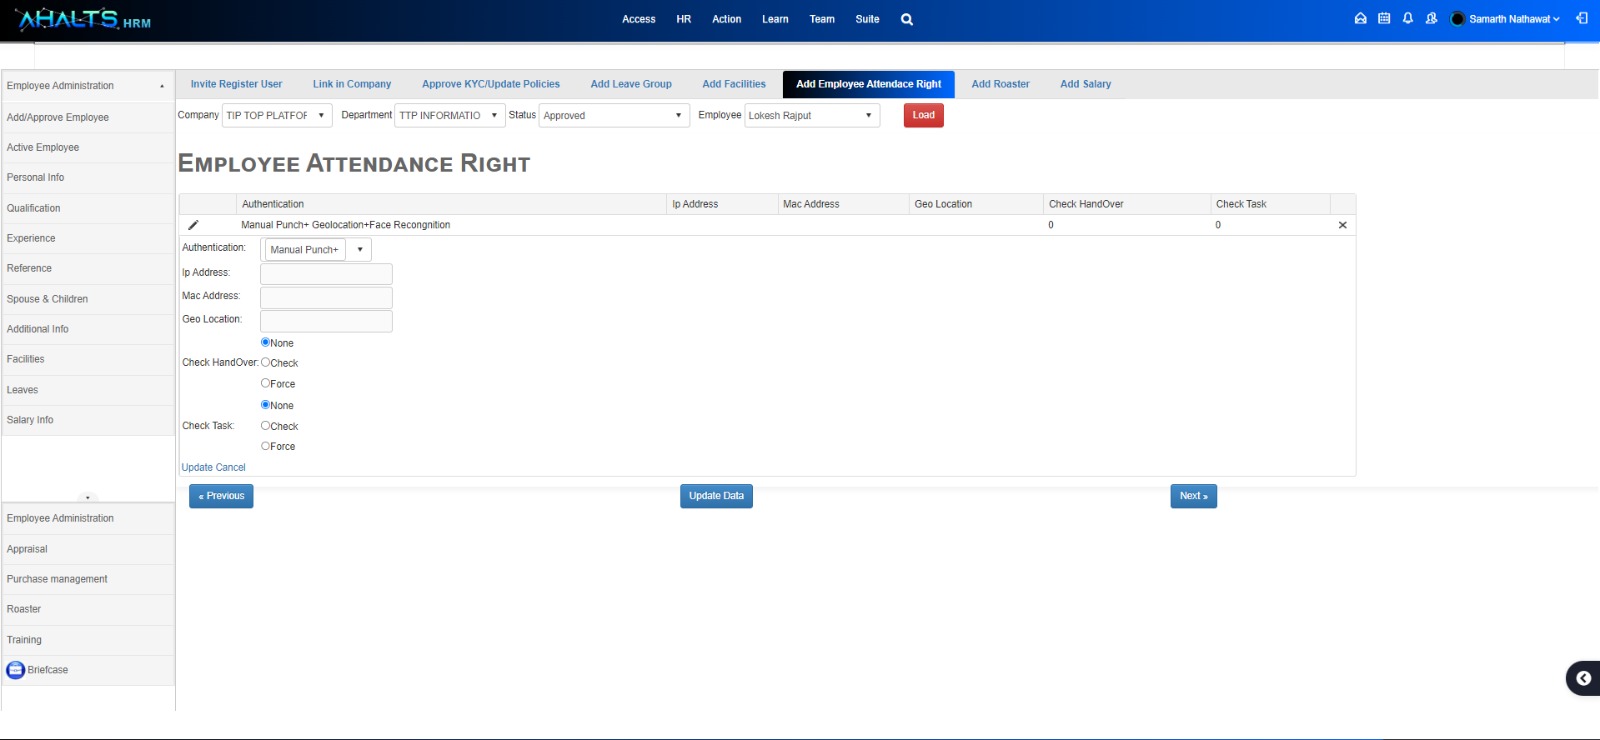
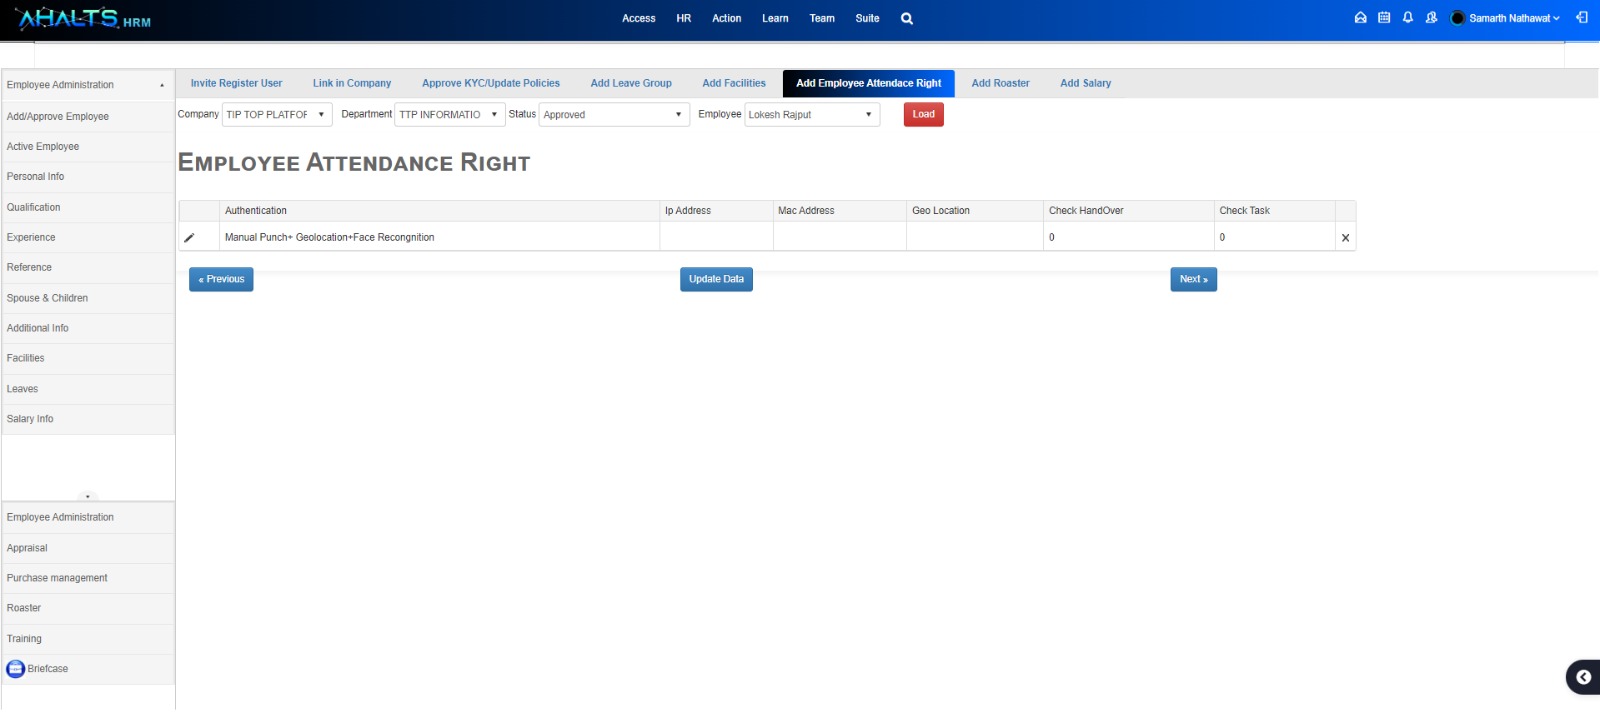
- Add Employee Attendance Rights
- Set Attendance Rights:
- Click Add Employee Attendance Right and then Load to view options.
- Select the Authentication Mode relevant for the employee.
- Click Update Data to apply changes.
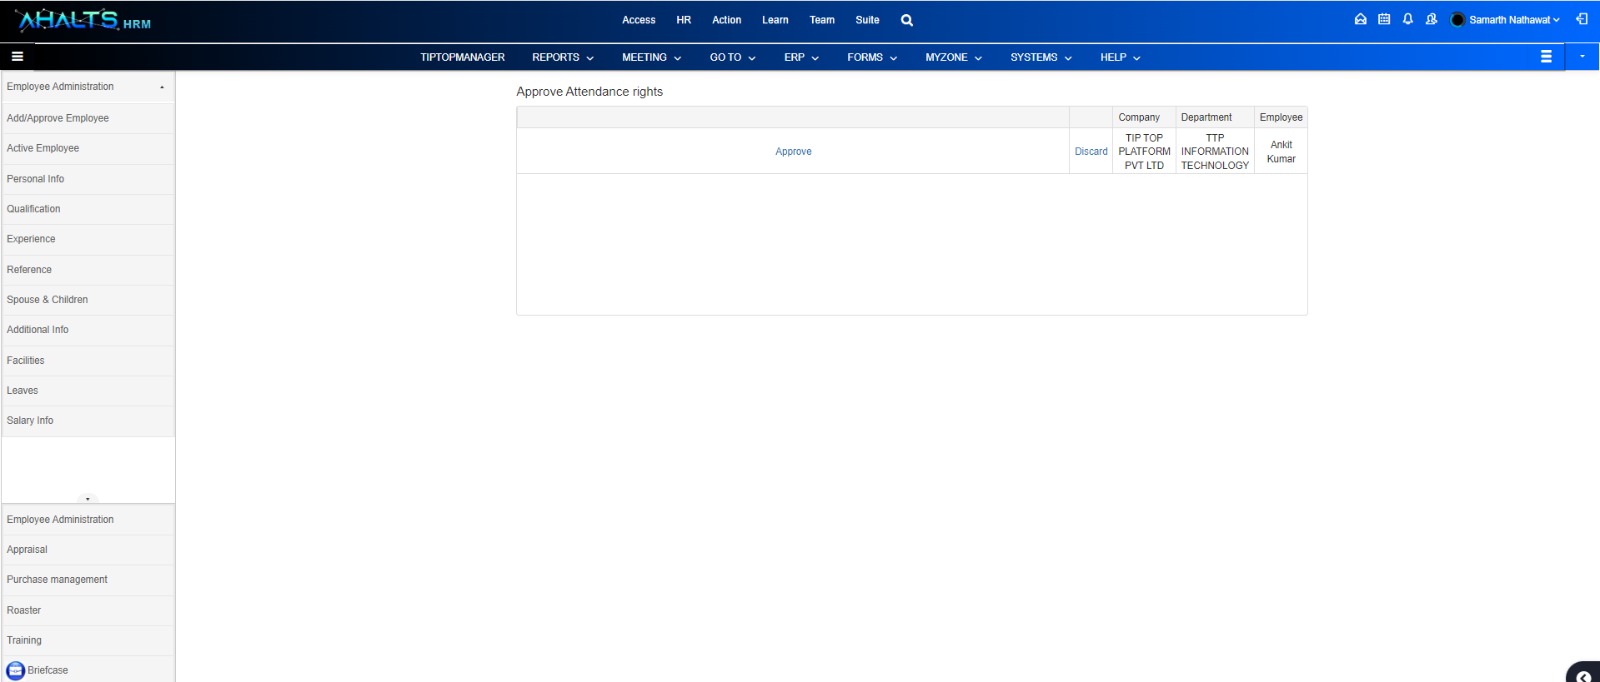
- Click Approve to finalize the attendance rights.
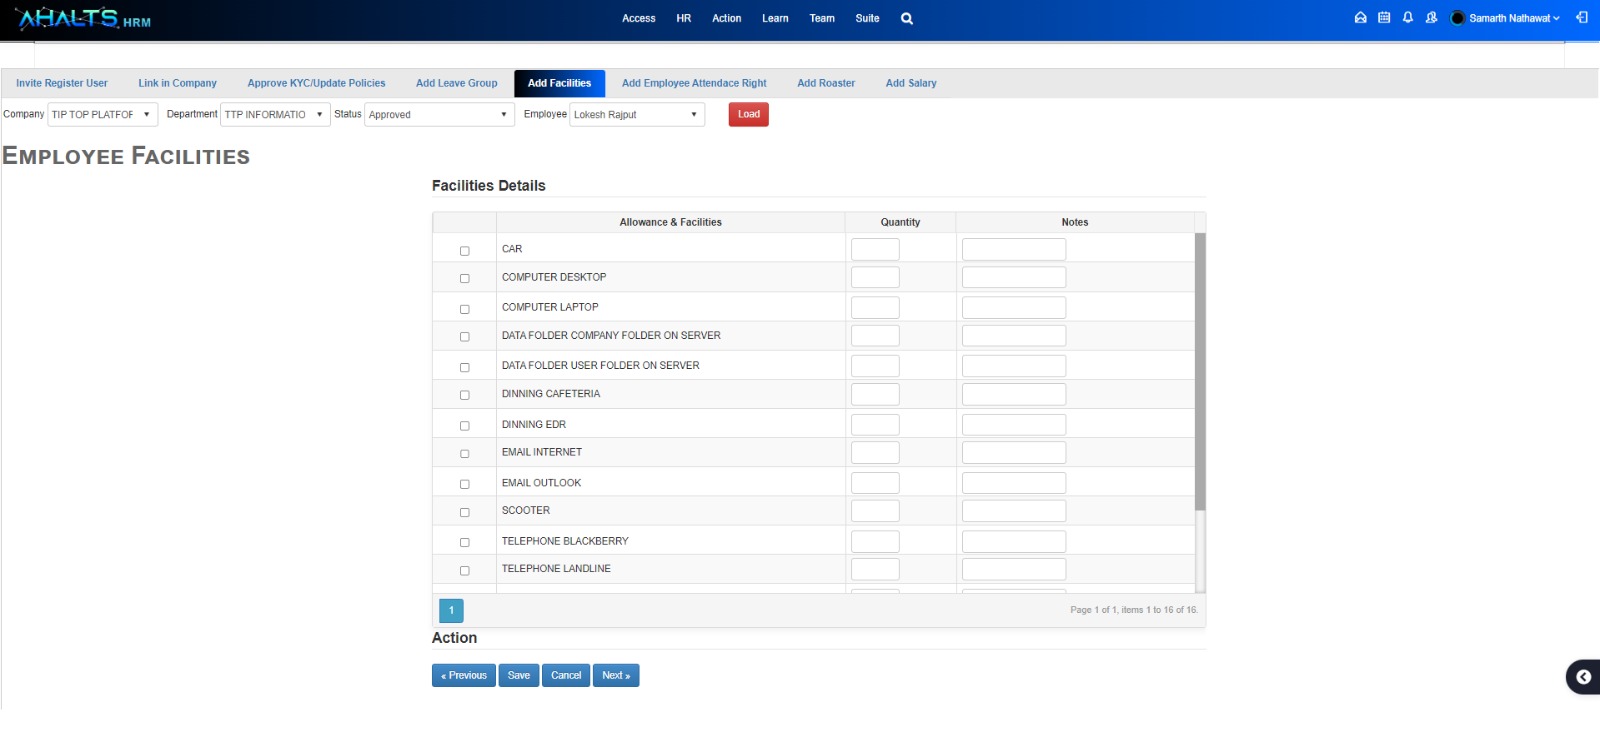
Then it’s comes for approve
 >
>
Click on approve
And approve data
 >
>
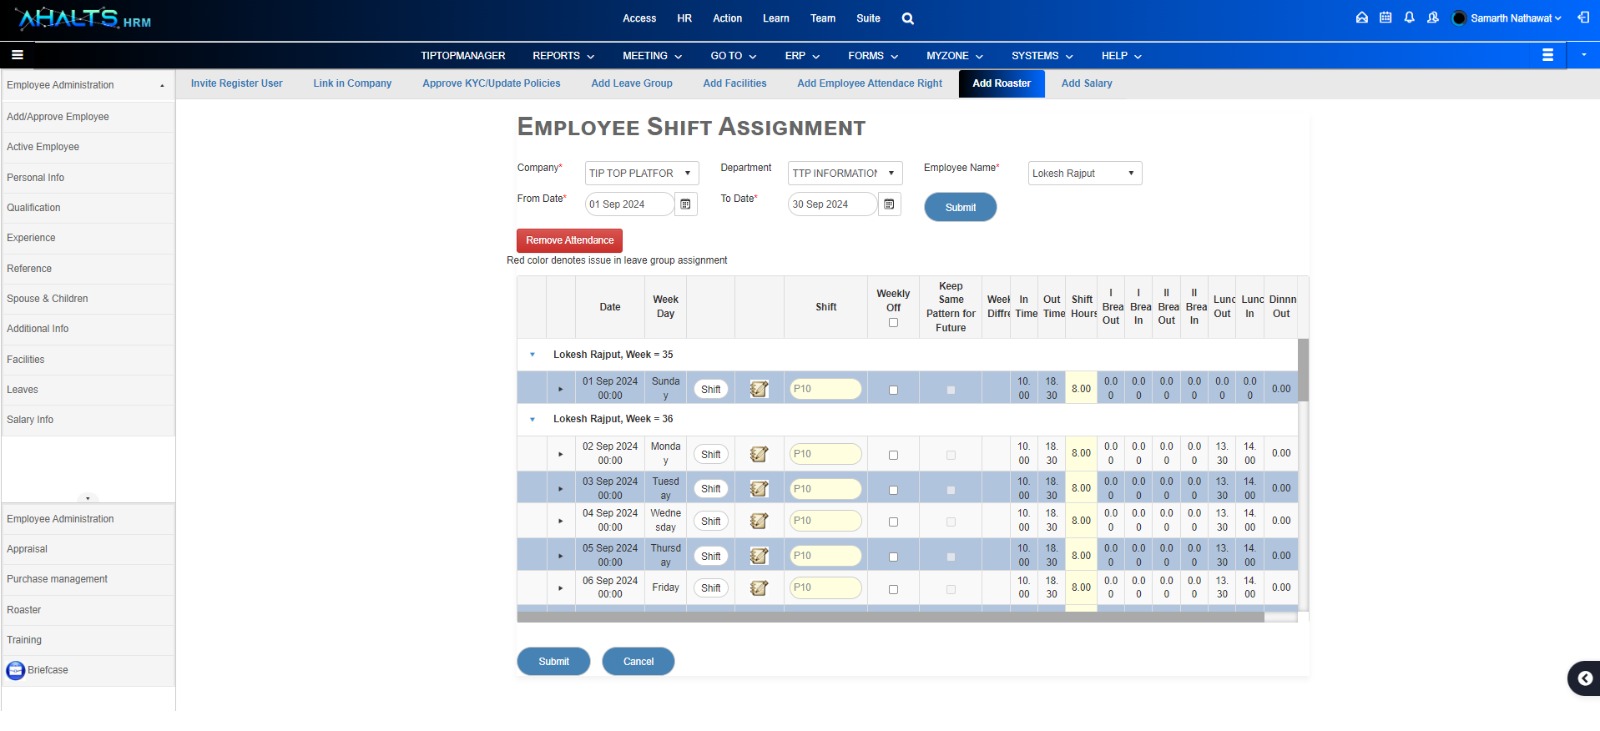
- Add Roaster
- Adding Roaster Details:
- Instructions for adding a roaster will be provided based on specific company needs. This section may include:
- Setting up shifts.
- Assigning specific days off.
- Any additional scheduling requirements.
 >
>
 >
>
 >
>
 >
>
 >
>
- Add Salary
- Access Salary Page:
- Enter your Password to access the salary management section.
Manual Salary Update:
- Fill in all required salary components, including:
- Base Salary
- Bonuses
- Deductions
- Click Confirm to validate the input.
- Select the Effective Date from the calendar and submit the record.
- Approve the salary record to finalize this step.
Salary Template Update:
- Select a salary template from the list provided.
- Enter the CTC Amount; the system will generate a salary breakup according to the defined template.
- Click Confirm, assign the Effective Date, and submit the record.
- Approve the salary record to complete the process.
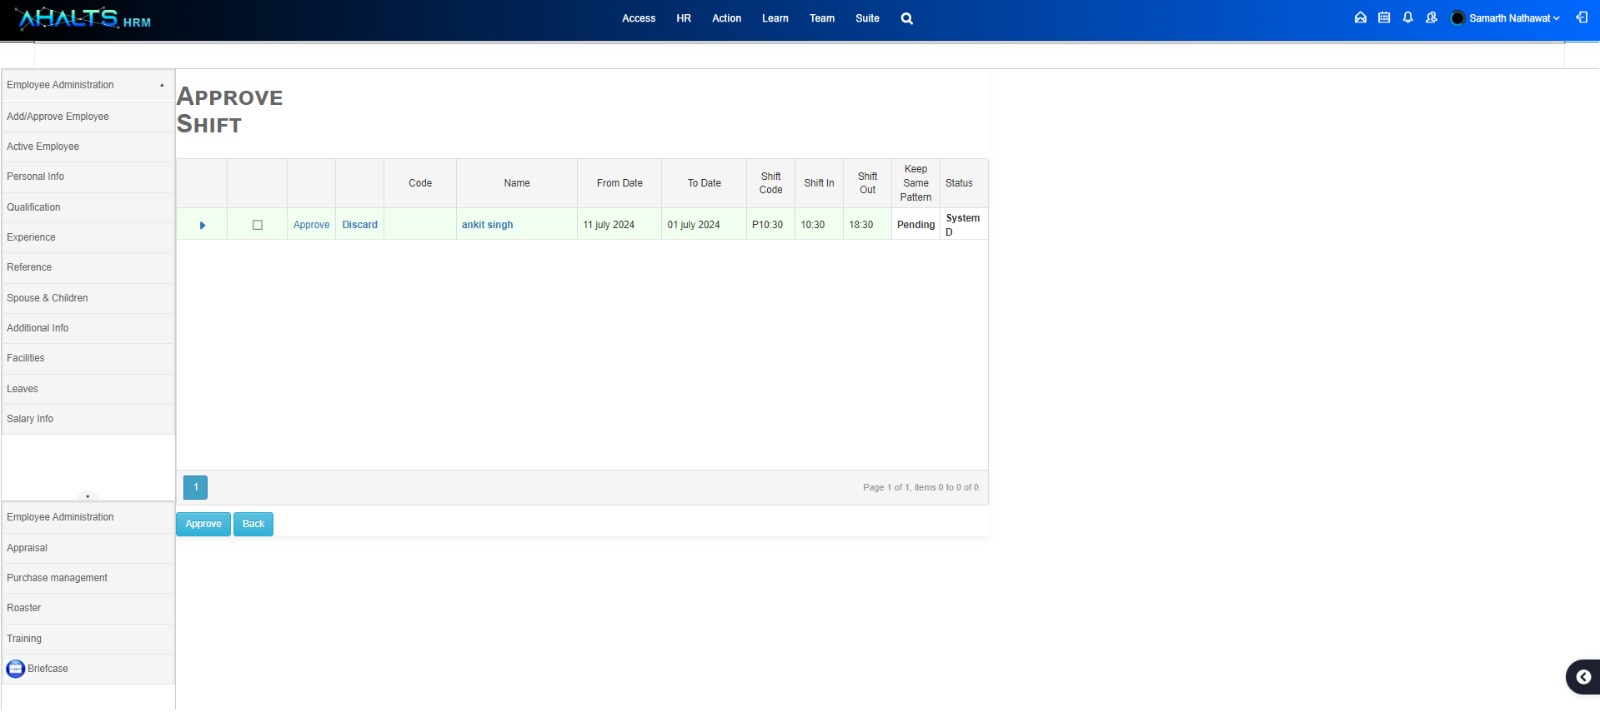
Put Password to access salary page.


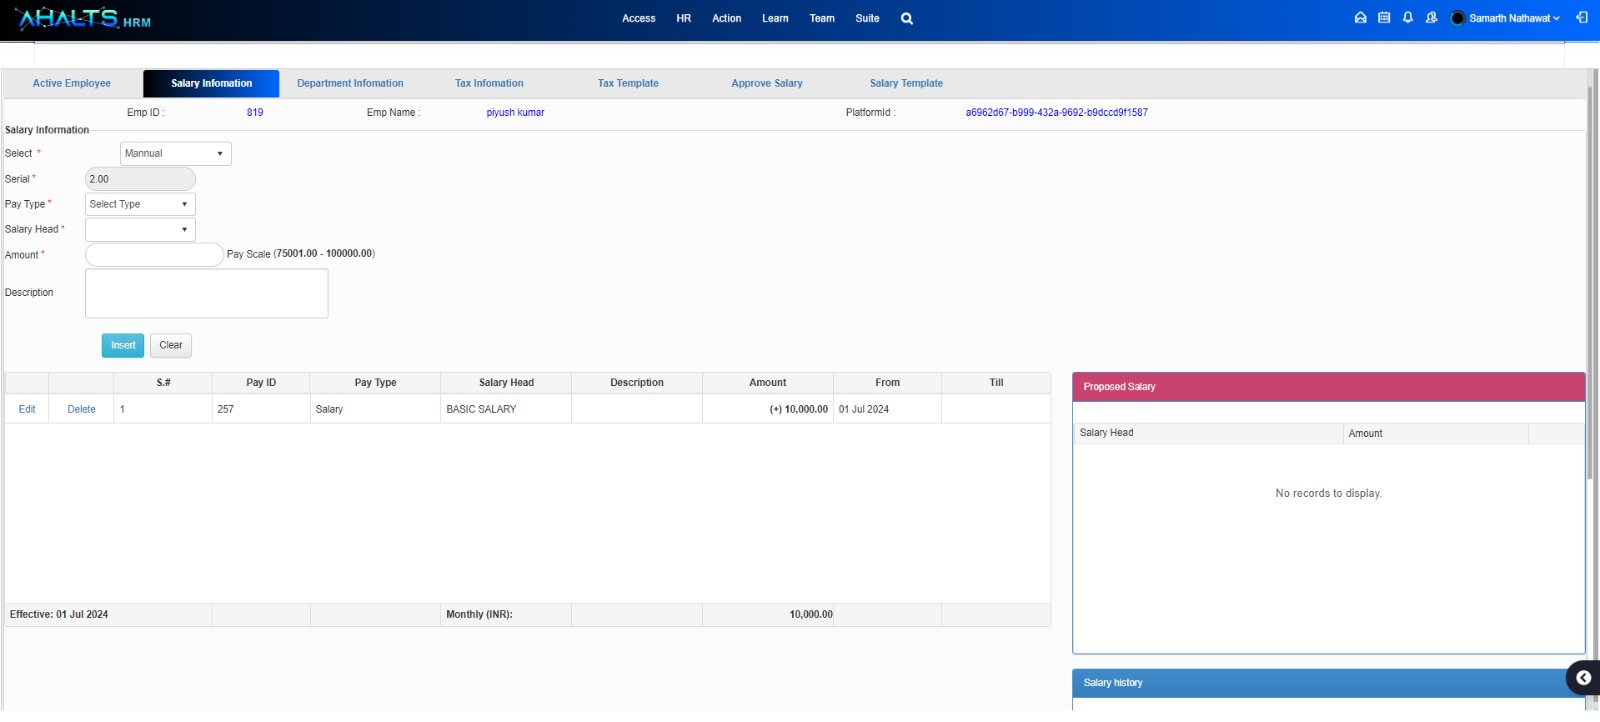
Employee Onboarded and ready to use AHALTS applications as per user roles and permission set in PAM.
Overview
Teams.ahalts is a project management tool designed to help manage your projects efficiently. It is suitable for large organizations managing multiple projects across various teams, as well as individual developers managing their own projects.
With Teams.ahalts, you can:
- Integrated with Tiptopmail , Drive and Business Management Platform
- Create workspaces, Kanban boards, and Scrum projects with sprints and retrospectives ??
- Manage lists and cards
- Add members, attachments, labels, checklists/items, due dates,comments and messages
- Utilize many more features to streamline project management
Features
General Features
- Workspaces: Organize projects and teams into separate workspaces.
- Kanban Boards: Visualize tasks and progress using Kanban-style boards.
- Scrum Projects: Plan work in a backlog and organize cycles of work into sprints, ideal for large, complex projects.
- Real-time Updates: Instant updates via WebSocket across all board members.
- Email Notifications: Stay informed with email updates.
- MessMail communication: Communicate with teams using mobile or web
- Powerful Search: Quickly find what you need.
- Attach and secure documents
- Dark & Light Themes: Choose your preferred interface theme.
Kanban Board
- Create Workspaces: Set up distinct workspaces for different teams or projects.
- Create Kanban Projects: Use Kanban methodology to manage tasks visually.
Scrum Projects
- Backlog & Sprints: Organize tasks into a backlog and plan sprints.
- Retrospective Boards: Conduct retrospectives to review and improve team performance.
-
- Automations: Streamline workflows with automation rules.
Board Features
- Add, Rename, and Reorder Lists: Customize board lists (e.g., TODO, IN PROGRESS, DONE).
- Add New Issues: Create tasks, stories, bugs, or epics.
- Move and Reorder Issues: Easily move issues between lists or reorder within a list.
- Edit Card Details: Modify titles and descriptions with an integrated text editor.
- Manage Labels: Add, edit, and remove labels to categorize tasks.
- Set Due Dates: Assign deadlines to tasks.
- Checklists: Add and manage checklists within cards.
- Assign Members: Delegate tasks to team members.
- Attachments: Upload and manage file attachments DMS integration.
- Comments: Add, edit, and remove comments on cards.
- Messmail: communicate in real time with chat or mail
- Archive and Reactivate Cards: Archive completed tasks and reactivate them if needed.
Automations
- Sync Parent and Child Tasks: Automatically synchronize tasks and subtasks.
- Smart Auto-Assign: Automatically assign tasks based on predefined rules.
- Auto-Create Sub-Tasks: Automatically generate subtasks.
- Sum Up Story Points: Aggregate story points from subtasks to the parent task.
Member Features
- User Registration and Login: Easy user onboarding and authentication.
- Add Members to Workspaces: Include new members in specific workspaces.
- Share Projects: Collaborate by sharing boards with team members.
- Manage Members: Add, remove, and edit member information within workspaces and projects.
- Edit User Accounts: Update user details and preferences.
Workspaces are containers for boards (and scrum projects in the future). As an admin, it’s the first thing you need to create. Members, projects, and boards contained within a workspace should be related. For example, if an organization runs projects for both a marketing and an engineering department, it would make sense to create two different workspaces named "Marketing" and "Engineering" so that they host their related members and projects.
You can create a workspace by clicking the upper right drop-down menu and selecting "Create Workspace." Alternatively, you can click the "START NOW" button on an empty home page.
Creating a Workspace:
- Click the upper right drop-down menu and select "Create Workspace."
- Fill in the new workspace's details and click "Create."
Managing Workspace Members:
- Click "Members" from the left side menu to search and add/remove members to/from a workspace.
- You need to be a workspace admin to add or remove members.
To filter the search results, you can check/uncheck the "Members only" checkbox.
Creating a Kanban Board:
- Click the upper right drop-down menu and select "Create Kanban Board."
- After creating a Kanban board, you can add lists to it. An empty board looks like this.
Continue by adding board lists to your board. You can find more information in the Boards section of the documentation.
Creating a Board List:
- In the boards page, click "CREATE LIST" from the top bar.
- Give a descriptive title to your list and click "Create."
Here is an example with three lists.
Reordering Board Lists:
- You can reorder your lists by clicking "REORDER LISTS" from the top bar.
Renaming a Board List:
- Click on a board list's title, and the text will automatically change to an input field. Make the change you want and click enter or the save button.
Members
Sharing a Board:
- Inside a board's view, click the "SHARE BOARD" button on the right side of the top bar.
- The modal will display the current board's members, and you will be able to search for users to add more.
Cards
Cards are the essence of a board, describing:
- What should be done
- When it should be done
- Who should do a particular task
- The current status of the task based on the list the card belongs to
Creating a Card:
- Click the ?button next to a list's title.
- Select from strategy Map or New create a standalone item (Strategy Map items if BPM platform licence activated ) This updates the performance metrics and API affecting score of the organization
- Select category
- Search item by name if strategylist else Enter the card's title and click save or press enter.
For scrum projects, the ?icon will be disabled if there's no active sprint. You need to start a sprint first.
Viewing a Card:
- You can view/open a card by simply clicking on it.
Editing a Card:
- Inside the card's view, you can edit features like assigning members, adding labels, creating checklists with checklist items, setting due dates, and uploading attachments.
Editing Card’s Title and Description:
- Click on the card's title to edit it.
- The card's view contains an integrated text editor where you can add custom HTML using its buttons.
Managing Checklists:
- Inside the card's view, click "CHECKLISTS" from the right menu.
- Enter a title and press enter or click the "Create" button.
- Click "ADD ITEM" at the bottom of a list to add items. Optionally, set a due date for each item.
Assigning Members:
- In the card's view, click the "MEMBERS" button from the right sidebar.
- Search for workspace users and assign them to the card.
Adding Labels:
- Click the "LABELS" button inside a card's view.
- Check the checkbox next to the label you want to add to your card.
Adding Dates:
- Click the "DATES" button on the right side of a card's view to open the date picker.
- Clicking two different days will assign both a start and a due date.
Adding Attachments:
- Cards may contain image or file attachments. Use the "UPLOAD FILES" button on the right sidebar to upload files.
Automations
Automate any task or process with a few clicks. Automation is a no-code rule builder that enables customers to build if-this-then-that rules based on events in Teams.
Sync Parent and Child Tasks:
- Navigate to the Settings => Automation view of your board and select to configure the "Sync parent and child tasks" automation.
- Configure the options in the drawer that opens.
Smart Auto-Assign:
- Navigate to the Settings => Automation view of your board and select to configure the "Smart auto-assign" automation.
- Configure the options in the drawer that opens.
Sum Up Story Points:
- Navigate to the Settings => Automation view of your board and select to configure the "Sum up story points" automation.
- Configure the options in the drawer that opens.
