

How to Use Training Module
Authentication using Human identification, location Tracking and Time Recording Service (AHLTS)
Mobile Attendance Application
API driven Integrated and AI based Mobile Attendance and Human Asset Tracking Application
Attendance Application:
Overcome the problems of tracking your employees through our efficiently designed location based attendance application, real time tracking features to support Geo-fencing and Real Time Geo-tracking which delivers a guaranteed productivity from your workforce.
What we deliver with Attendance Apps:
Maintain records of punch timing along with the location data of respective employees to ensure the effective time utilization and avoid any kind of time thefts. With the implementation of our attendance apps can track employees who are working in the office as well who are field workers, get their punch timings and punch location tracking easily within a single window.
1. Increase Productivity
Increase transparency of working scenarios with real time location tracking which allows managers to give instructions for taking out productive work from employees.
2. Real Time Location/ Live Location Ping and instant messaging
Get the current location and route details of your employees on fields or are on business trips using ping service. On real time basis employee/ supervisor can share or request to share his/ her live location to supervisor/ manager to guide them for better working and improved efficiency.
3. User/ Employee Authenticity validation using Bio Matric and Device Mac Address
Authenticate user by his/ her own Mobile device while marking his/ her attendance along with finger scanning. It will safe guard from proxy attendance marking.
4. Auto Punching in Office
With location based punching you can virtually fence all your office premises to enable auto punching with your employees mobile devices along with respective locations.
5. Multiple Platform
We have made our application to support any kind of mobile devices on platforms like Android and iOS so that you can install it on any mobile devices, or tablets of any brands.
What to expect from Tip Top’s Mobile Attendance App Solution?
Tip Top’s Mobile Attendance solution is robust and efficient and designed for all type of industries. Your company can manage employee’s attendance, payroll cycle & performance analysis from Tip Top’s centralized cloud-based attendance app which is 24 X 7 accessible and scalable.
Tip Top Mobile App User Manual
Application is currently working for Geo Fencing, Bio Metric, NFC Tag, Mobile Device Mac address and for Manual Attendance user validation and for punching their attendance.
Registration Process:
A) Location Registration
B) Finger Registration (Bio Metric Registration)
C) Mobile Mac Address Registration
D) NFC Tag Registration
A) Registering Location using Mobile App:
- Initially for using Geo Fencing Location tracking and authentication services, we need to register Location first.
- For Registering Location: Only Administrator/ Supervisor are authorized to do so. (User Roles and Permission needs to be set from Tip Top Platform)
- Admin/ Supervisor will login into the application using his/her TT Mail credentials.
- Initially for using Geo Fencing Location tracking and authentication services, we need to register Location first.
- As this app is API driven, so automatically we will have Locations which was already there into the web application.
- Already available Locations, now needs to be registered as Parent location. And inside that parent location we can define sub locations too which comes under that parent location radial area.
How to Register Location:
- To register any location, only administrator having the rights. So he will login with his/her Admin credentials into tiptop mobile application

- Enter company name in first text box as indication to, Enter user name and password than click on Sign In button given at the login page of this app.
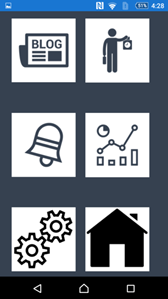
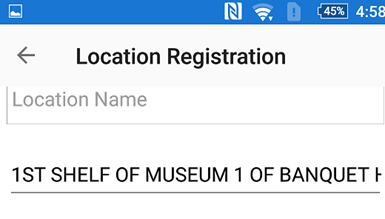
- Once Logged in, at the bottom of app menu open “Register Location” menu item.
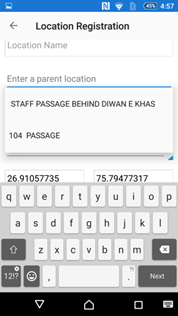
- After click on Register Location Menu item, the concern page will be displayed with the available text fields as Location Name. Parent Location, Category, Department, Fence Radius and Status etc.

- In place of Parent Location drop down menu, it will display the name of locations which is already open/ available to get registered. So admin needs to register Parent Location first through the mobile app.
- Select Location to register from drop down menu (existing locations will be displayed in drop down)
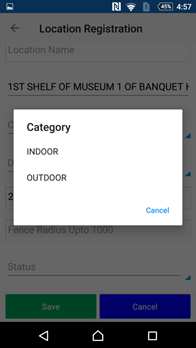
- Select the Category from the drop down as Indoor or Outdoor.
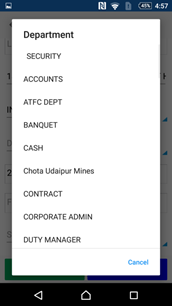
- Select the department where this particular Location falls in or relate to. Department list will be displayed in drop down menu.
- Once Location is selected than app will automatically fetch its longitude and latitude and it will be displayed in the space provided already in app.
- Enter the geo fence area (radial geo fence distance needs to be entered here- it must be set from the central point of registering location in meters only)
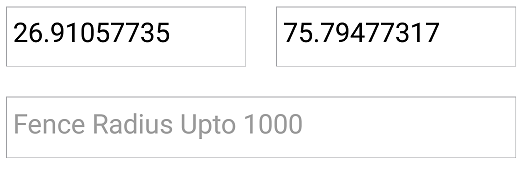
- App will automatically get the longitude and latitude of that particular location and then click on ‘SAVE’ button given at the bottom of this page.
- “Location successfully registered” alert will be displayed.
- Now the parents’ location has been registered successfully.
- Once parent location gets registered successfully, now we need to register Sub locations under that registered Parent location geo fence.
For Registering Sub Location under Registered Parent Location:
- Enter the name of Sub Location in text box as given
- Select the registered parent location from drop down menu under which this Sub location comes (within the registered and assigned Geo Fence Radios of parent location)
- Like if Parent location’s radius is 30 Meters than its sub location should be within that 30 meters (5-10 meters under that geo fence)/ if sub location is outside of Parent location geo fence then app will throw an alert message that “Sub location must be in Parent location fence area”.
- Enter the sub location fence radius are and fill the required details on that page.
- Click on ‘SAVE’ button and then an alert message will pop up like location registered successfully.
B) Register Fingers of Employee (For Bio Metric Authentication and Validation)
- Administrator is having rights to register employee’s fingers through the mobile app.
- Admin will login with his/ her credentials into the app.
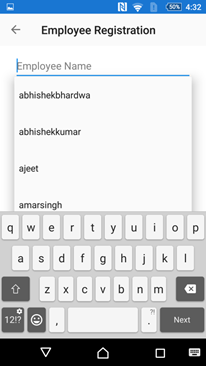
- By selecting Employee Registration Menu: He needs to select Name of Employee from the drop down (In drop down all the available and assigned employee’s name will be displayed and admin can search particular employee name from there)
- Admin will select the name of employee whose Fingers he is going to register
- All available employees’ list will be displayed in drop down menu, and admin can select the name of employee who’s Finger he want to register using app.

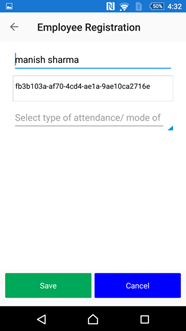
- Once Employee name is selected its associated Employee ID will be displayed in the text box given.

- On the next option, app will ask to select the mode of attendance, admin want to register for.
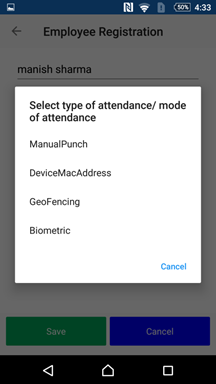
- Here, the list will be displayed for the permissions which admin has already granted to this particular user to punch his/ her daily attendance.
- For finger registration, admin needs to select Bio metric option from the drop down.
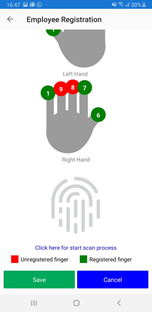
- Once Bio Metric option is selected from the drop down menu, this will give pictorial option to select the number of fingner along with right or left hand selection.
- Which ever Finger employee want to register for himself, admin needs to select that finger number from the given option, admin will click the particular finger number as per given hand.
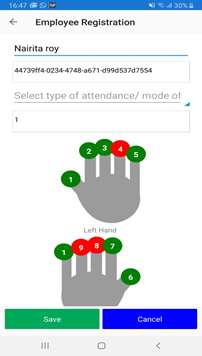
- Initially the color of all fingers will be displayed in RED color as they are unregistered fingers in app, while once any finger gets registered this will be displayed in GREEN color.
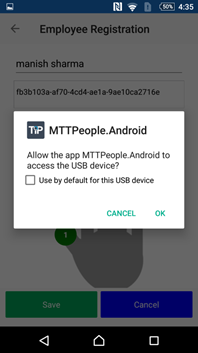
- For Registering finger, Admin needs to attach Mobile device with Bio Metric Attendance device (We have used StarTek FM 220U device for the same which is Aadhar approved device already)
- Once we attach Bio Metric device with the Mobile, it given an alert to allow the device to communicate with the app, so user needs to click on allow button.
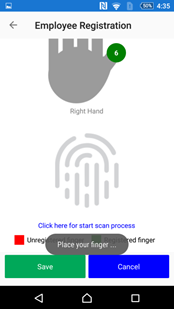
- Once admin selected the number of finger, employee needs to put his selected and right finger on the space provided for scanning.
- Once employee puts his appropriate finger on Bio Metric device, app start scanning and registering that finger.
- Once scan completed, app displays a message as “ Finger Scanned Successfully”
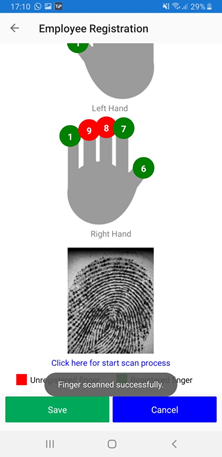
- Once finger scanned successfully, admin will click on Save button and this will save the finger data inside the app for particular employee. (Finger Registered Successfully now)
- Admin and employee can register multiple fingers using this app, and the registered fingers will be displayed in GREEN color while un registered will be displayed in RED color.
C) Mobile Mac Address Registration through App:
For validating attendance we have Mobile Mac address validation too. In which Employees’ Mobile Mac address will be registered using app, so that employee will be able to punch his/ her attendance by using his/ her registered Mobile device only. So this will validate and authenticate the employee for punching his/ her attendance.
- For registering employees’ Mobile Mac address, admin/ supervisor will login on the app (Employees’ Mobile app) with his/ her login credentials
- Admin/ Supervisor needs to select the employee name from the drop down menu for whose Mobile Mac address he is going to register/ mobile belongs to which particular employee.
- By selecting Employee Registration Menu: He needs to select Name of Employee from the drop down (In drop down all the available employee’s name will be displayed as it is coming from Employee Master Data API from Back end)
- Admin will select the name of employee who’s Mobile Mac Address he is going to register from the drop down menu.
- Once Employee name is selected its associated Employee ID will be displayed in the text box given.
- On the next option, app will ask to select the mode of attendance, admin want to register for.
- Here, the list will be displayed for the permissions which admin has already granted to this particular user to punch his/ her daily attendance.
- Here, admin will select “Device Mac Address” option.
- Once Device Mac Address option is selected from the drop down menu, this will automatically fetch the Mobile Device Mac Address and will display the same on given text box.
- Admin will click on ‘SAVE’ button to save this Mac Address for respective employee.
- This way employee will be able to punch his/ her attendance through only registered Mobile device.
E) NFC Tag Registration
Location Aware Services-
The location aware services can be used to acquire a user’s location. Employee/ User’s position can be still determined using mobile phone with the help of NFC (Near-field communication) positioning devices. On selecting NFC, supervisor manually insert/write data inside the NFC Tag and its location need to be registered first against any employee who is allowed by the administrator to punch his/ her attendance from any particular location only. NFC tag needs to be write/ value need to be inserted by the Admin inside the NFC tag regarding employee Name, Location and Category where such employee is allowed to present physically to punch his/ her attendance.
- Admin will login with his/ her credentials into the mobile app.
- Once admin logged in, he will go for employee registration menu icon.
- Here, Admin will write the data/ registered employee details, location and category inside the NFC tag.
- First admin/ Supervisor will select the name of employee from the drop down who is allowed to punch his/ her attendance through NFC Tag.
- Employee’s associated Employee ID will be displayed once employee name selected from drop down menu.
- Admin will select the mode of attendance he is allowed from ‘Select type of attendance/ mode of attendance. Here admin will select NFC type.
- Once NFC Tag mode is selected, Employee Registration page will open.
- On Employee Registration page, admin will select the Supervisor name from the given drop down menu.
- Location category need to select from second drop down menu as Indoor or Outdoor.
- At Select Location, admin need to select the location name which is already there in drop down menu item. These location manes will come from tiptop platform back end only. The NFC Tag will be written from here with the values including the location where NFC tag need to be fixed, Employee name who is registered for that location to punch his/ her attendance etc.
- Finally admin will select the type of NFC Tag he is writing inside with the provided values.
- Once admin puts the required information regarding Employee Registration and NFC Tag details, he needs to write the same into the NFC Tag. For writing those parameters into the NFC Tag, Mobile with app need to be in the range of that NFC Tag. Means as NFC Tag will come near to that mobile device, app will automatically display the alert that “NFC Tag Found”, and now admin will click on SAVE button to write those parameters into the NFC Tag.
- Once saved all those parameters, app will display the alert like “Tag Written Successfully”. By this way Employee and Tag will get registered into the App.
: Attendance Check In/ Check out Process:
Once Employee get registered for Location, Device Mac Address, NFC Tag and by Bio metric device finger registration, now employee can check in/ checkout from the Mobile app with the attendance rights he is allowed to do so.
For User Validation and authentication, we have provided multiple combination methods of user validation or authentication. Admin or organization can use any method of check in/ check out independently or in combination.
Attendance Check in / Check Out process through available or allowed Methods:
A) Attendance process using Bio Metric, Location, Device Mac Address method (combination of 3 validation)
- If employee is already registered and allowed by the administration/ supervisor for Bio Metric, Location and device mac address method of attendance check in/ checkout, he will login with his own credentials into the mobile app.
- For punching attendance he will have to select check/ checkout menu item from the home screen.
- Once user clicks on this icon, this will give the page to mark his/ her attendance.
- Here, employee will select type of attendance/ mode of attendance, he is allowed for.
- Once employee selects his/ her mode of attendance, complete page of check in/ check out will be displayed.
- Now on second option, employee need to select the location from the drop down (location), he is already registered for punching his/ her attendance by the admin.
- If employee is allowed to mark his/ her attendance from multiple locations. Then here in drop down he need to select the location currently he want to punch his/ her attendance at that moment. Otherwise if he is allowed to mark attendance from single registered location that it will come by default in that text box.
- Once user selects his current location to mark his attendance, app will automatically fetch his current location for which he was registered for. We have incorporated Google location map inside the app to display the live location of employee. If employee is within the registered geo location range, than google map will show the pin location. If employee is outside of the fence area, than app/ google map will show the employee location as out of defined geo fence area. Out of fence area app will not allow the employee to mark his/ her attendance and will display the alert as first “Go inside the fence area to mark your attendance”.
- If user is inside the defined and registered geo fence area, than app will validate his location automatically.
- Now user need to connect his mobile device with Bio Metric attendance device, once user connects the bio metric device with the mobile, it will give an alert to allow the device to communicate with the mobile app. User will click on OK button to give the access permission.
- Now user will use his/ her registered fingers to scan for marking his check in or check out. Registered fingers will be shown in GREEN Color while unregistered finger will be shown in RED color. - If more than one fingers are registered already inside the app, than user will select the number of finger he want to use for marking his attendance from the given picture of hand. Once user choose the particular finger, its finder ID will be saved inside the text box provided.- No user will go for check in or check out of his/ her attendance. First time only Check In button will be enabled to mark check in only and check out button will be disabled. (without marking check in, check out is not justified)
- Once user click on check in button, automatically Bio Metric device scanning panel activated, and app will display an alert message to user to put his registered finger on scanning device to match his finger with the already registered finger.
- Once user’s finger gets match with the Registered Finger, app will display the message like” Scan Matched”
- Once scan matched, app will again display an Alert with “Attendance Checked in” with Date and time of attendance marked. And by this way user will be able to mark his/ her attendance.
- Once attendance is marked, it will be displayed in the Grid provided to record the attendance data along with Date, Check in/ Check out time, and with location including its latitude/longitude.
- The same procedure will be used while user wants to mark his/ her check out.
- One more validation will work simultaneously along with Location and Finger validation which is Device Mac Address.
- Until and unless user is using his registered mobile device (Registered by Mac Address), he/ she will not be able to mark his attendance. Mobile Mac Address authentication is also associated with this attendance combination. App will allow only if authentic and registered mobile device is used to mark the attendance, otherwise app will again display an alert like: “Device Mac Address not matched”
B) Attendance process using NFC Tag Method
If particular employee is registered to mark his/ her attendance through NFC Tag only, than user needs to tap his mobile device near or onto the NFC Tag, so that mobile app will read the data available inside and written inside the tag in order to validate the user and its location. In this case user needs to be present physically very near to NFC device for validation and authenticity of its attendance at that particular location/ area.
- User needs to go near the registered and placed NFC area first.
- Now, user will login into the mobile app using his/ her login credentials.
- User needs to select the check in / checkout option from the available menu item from home screen.
- Once he select the check in/ check out menu, attendance marking page will be displayed.
- Now, user needs to select type of attendance/ mode of attendance from the drop down menu.
- In case of NFC method of attendance, app will display this mode inside this text box.
- Once user select NFC method of attendance mode, he need to be very near to FFC Tag so that mobile app can read the data available inside the NFC tag to verify the user’s actual location and NFC tag’s location.
- As user come within the range of NFC Tag app will display an alert that” NFC Tag Found”
- If user taps his mobile device onto or near the NFC Tag, app will read the data and validate the same and now user will be able to mark his/ her attendance.
- User will click on check in/ check out button to mark his/ her attendance, and again an alert message will come as ““Attendance Checked in” with Date and time of attendance marked. And by this way user will be able to mark his/ her attendance.
- In case user is away from the NFC Tag, than app will throw an alert message like” NGC Tag not connected. Please wait or move your device position near the NFC Tag”
C) Attendance process using Device Mac Address:
Device Mac address is another way to validate Employee’s device from which he/ she is allowed to mark his/ her attendance. Using unregistered mobile device user will not be able to mark his attendance. So by this way it will again validate and authenticate user who is marking attendance. Admin can restrict employee to mark his attendance by using his own mobile device and this will improve authenticity of user and marked attendance too as every mobile device has unique ID as Mac address.
- For check in/ check out user will login with his login credentials.
- User will select Check in/ check out menu item from the home screen.
- First user has to select the option/ method he is allowed to mark his/ her attendance. In this case user has to select Device Mac Address method to do so.
- Once that method of attendance is selected by the user from drop down, it will not give an option to check in/ checkout attendance using the buttons.
- User will click on Check In button to mark his/ her attendance.
- App will check/ validate the Device Mac address in back ground, and if validated and registered Device is found it will allow check in or checkout.
- If registered device not found, than at the time of check in/ check out app will display an alert message like “Device Mac Address doesn’t matched”
D) Attendance process using Geo Location:
- User will login using his/ her login credentials into the mobile app and select the attendance check in/ check out option from menu item.
- First user has to select the option/ method he is allowed to mark his/ her attendance. In this case user has to select Geo Location method to do so.
- Once that method of attendance is selected by the user from drop down, it will give an option to select the location from where he is willing to check in or heck out or the location he is allowed to mark his attendance. If multiple locations are allowed to him than he will select the location where he is standing at that moment. If only single location is allowed to him than that location will be displayed by default to him.
- User will click on Check In button to mark his/ her attendance.
- Once the location has been selected by the user, app will automatically validate his current location that weather he is in defined and registered geo fence or not. Using google geo location map and latitude/ longitude.
- If the user is in defined geo fence area than he/ she will be able to mark his/ her attendance.
- User will click on Check in/ check out button to mark his/ her attendance.
- Finally, he will be able to mark the attendance successfully.
- If user is out of defined and registered geo location, app will throw an alert like ”Please go inside the geo fence area to mark your attendance”
Supervisor Mode of Attendance Check-in/ Checkout
This functionality is provided for user to punch their attendance without Login into the application using their individual login credentials. (Quite similar like Bio Metric machine attendance system)Once Admin/ Supervisor login into the app using his/ her own login credentials, all the staff members/ users list will be displayed (all the allowed and under his supervision staff list). Now all the relevant staff members can punch their attendance using that supervisor login.
- Supervisor login into the app using his/ her login credentials.
- Supervisor will click on Right most top icon available on home screen post login.
- Here, on supervisor mode of attendance scree, user will get an option to select his/ her name from the given drop down menu.
- Once user selects his/ her name from the drop down, user will select the type of attendance he is allowed or registered already to do so from the drop down.
- Only the permission/ allowed type of attendance type will be displayed there in drop down menu for which particular user has been allowed and registered.
- Once user selects the type of attendance type, the respective method of check in/ check out will be displayed.
- User will follow the instructions and procedure to mark his/ her attendance as per the pre explained methods.
- Once user check in/ check out, an alert message containing check in/ check out time of successfully punching will be displayed.
- Once first user checks in/ checks out the screen will be again in fresh mode of attendance punching from where another user has to select his/ her name from the drop down to mark his/ her attendance as explained above.
Check In/ Check Out using Mobile’s Finger Scanner
This functionality for check in and check out will work in case particular employee is using his/ her personal Mobile phone to mark attendance and if Finger Scan feature is inbuilt inside the mobile phone as now a days most of the mobile phones having such facility.
The user can mark his attendance using the same finger which is already registered with his mobile’ finger scanner, if user has not registered his finger using mobile’ finger scanner than first needs to register the same before using this app for check in/ check out.
Once user is registered with the finger than the below steps will allow him/her to mark the attendance using Tip Top Mobile app.
- Once user log in into the app and go to attendance check in / check out page.
- Here, user need to select the type of attendance/ mode of attendance, allowed and registered mode will be displayed in drop down and user will select the same.
- Once type of attendance is selected, its relevant options will be displayed inside the app.
- If Bio metric attendance mode is allowed to this user, than app will ask about type of finger print device user want to use for check in/ check out.
- If user select the type of device as Scan through Mobile than app will allow him to punch his/ her attendance using his Mobile’ Finger Scanner.
- User will click on Check in button and app will show the alert to use Mobile’ Finger Scanner in order to scan the registered finger.
- Here, app will identify and validate the scanner finger (user will touch the mobile’s finger scanner using his registered finger) and if the correct and registered finger is scanned, than attendance will be marked successfully and an alert message will be displayed containing the time of attendance check in/ check out.
- If user does not scan the registered or correct finger than app will display an alert to use the right finger to mark attendance.

